What have you 3D printed?

You just have to change the .TXT file extension to STL or 3MF depending on which one it is. The Ender 3 V2 is a great machine, that's what I currently run at my house and it sounds like you got a great deal. Printing is a fun hobby and coming up with useful applications can also be a hobby in itself! On my Ender 3 I added the touch sensor for bed leveling and upgraded some components like the filament spool holder and lead screw stabilizer. One place to start would be searching for upgrade parts that you can print for your printer. Happy to help with any settings or Cura questions you have. Even with a remote drive extruder and no enclosure the Ender 3 can print PETG and TPU.

I just ordered a K2 plus combo with the CFS so we'll see how that compares to the X1C once it comes in. I have Solidworks so I'm also able to design my own parts. Usually they're just cosmetic items like fridge magnets but working on a case for my air pressure gauge and auto deflators currently. Just getting ideas for parts can be tricky but this forum can help with that too!
I love my k2 plus. Hopefully, you feel the same!
 
Thanks for the tip on the file name. Will try to print one tomorrow.

I originally got it from him with the intent to print the cup holder insert for the, 23+, then after getting the printer yesterday, couldn't find the file... then realized... its probably too long to print on the ender anyway. Tonight I was trying to print a holder for the kids switch controllers, but the 4 controller holder is too big to print unless I do it at an angle and waste more material on support than the item itself. Right now all the filament isn't have is PLA... so will need to get other material types as I get into it.

Doing my first print currently of a fidget toy for the kid.

I have the artistic ability to screw up a stick figure, so not sure I want to venture into designing my own parts.
If you are doing supports, try tree supports as it should use less filament. I prefer my tree supports always touching the bed as it will give a cleaner part vs having trees grow all over the part.
 
I love my k2 plus. Hopefully, you feel the same!
Wish I could say I do. It was delivered Jan 17th, but was damaged. Dealing with Creality customer service has been nothing short of a nightmare. On their website chat they said they would replace the printer, and that I should keep the CFS and filament (since I ordered the combo unit). It took 2 weeks for them to give me the shipping label, 1 week transit, then 2 weeks of no contact after it was delivered. Yesterday they said they were partially refunding me, just for the k2+. The amount is less than the list price of another k2+, and then with sales tax on top of that I would be out over 200. I am demanding either a full refund or a k2+ replacement like what they promised. I am soured by the whole situation and really wish I would have bought through Amazon or Best Buy.

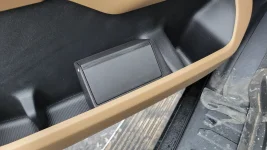
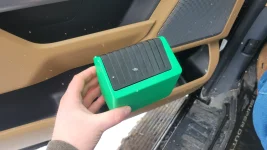
Happy to say though that I finished my door pocket trash can. It fits snugly in the door pocket and has a lid that closes on its own. The fit in the door is tight enough that it doesn't slide around while driving. It is within reach from the drivers seat and functions perfectly for straw wrappers, receipts, etc. I was inspired by cup-holder trash cans but thought a custom fit one would be cooler. I used black PLA+ for the prototyping and used PETG for the green one. The black PLA+ actually matches the door pocket really well and blends in. Because I had the green PETG I went with a mini dumpster theme. Dialing in the PETG was a bit tricky. If I was going to make more I would consider ASA instead but would probably have to tweak the size slightly since ASA shrinks a little bit so it might not fit exactly right in the door.
 

Attachments

  • 20250213_124955.webp
    20250213_124955.webp
    224.1 KB · Views: 147
  • 20250220_125151.mp4
    11.9 MB
  • 20250220_125130.webp
    20250220_125130.webp
    121.7 KB · Views: 138
Would be awesome if someone can 3D print the American flag that’s on the 2023+ F250’s to fit on 2022 and down F-250s air vents
I like this idea and would love to help, but I have a 24 so not sure how I would design it. If I have the opportunity I could 3d scan the vent on a 22. It would likely require prototyping and multiple iterations to get it just right though. I might be able to do something less complicated, more universal, like a 2d flag that has clips on the back that you can press onto the air vent blade.

Could someone please post a picture of a 2022 or earlier model's dashboard in that area?
 
Wish I could say I do. It was delivered Jan 17th, but was damaged. Dealing with Creality customer service has been nothing short of a nightmare. On their website chat they said they would replace the printer, and that I should keep the CFS and filament (since I ordered the combo unit). It took 2 weeks for them to give me the shipping label, 1 week transit, then 2 weeks of no contact after it was delivered. Yesterday they said they were partially refunding me, just for the k2+. The amount is less than the list price of another k2+, and then with sales tax on top of that I would be out over 200. I am demanding either a full refund or a k2+ replacement like what they promised. I am soured by the whole situation and really wish I would have bought through Amazon or Best Buy.

Happy to say though that I finished my door pocket trash can. It fits snugly in the door pocket and has a lid that closes on its own. The fit in the door is tight enough that it doesn't slide around while driving. It is within reach from the drivers seat and functions perfectly for straw wrappers, receipts, etc. I was inspired by cup-holder trash cans but thought a custom fit one would be cooler. I used black PLA+ for the prototyping and used PETG for the green one. The black PLA+ actually matches the door pocket really well and blends in. Because I had the green PETG I went with a mini dumpster theme. Dialing in the PETG was a bit tricky. If I was going to make more I would consider ASA instead but would probably have to tweak the size slightly since ASA shrinks a little bit so it might not fit exactly right in the door.
Did you post the files anywhere?
 
Did you post the files anywhere?
I did not post them anywhere yet, but see the attached for the dumpster models. The lid requires weight inserted so that it closes on it's own. I had it pause mid print so I could insert the weights (the prototype just had them stuck on with the tape). The pause might come through on the 3MF, not sure. I used 3x 1/4 ounce wheel weights. The lid attaches with M3 socket head cap screws. Any length will work, since the entire length of the lid has the cylinder cut. Tapping is not required, the hole is sized so the screw can self tap when screwed in. I used support blocker for the weight cavity and the lid screw hole, not sure if that will come through on the 3MF or not either. Dimensionally it should come out good with PLA or PETG. For ASA, scaling up 1-2% in the slicer may be required. PLA might deform if you live somewhere hot.


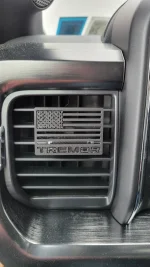
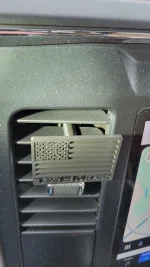
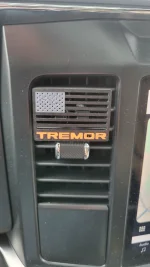
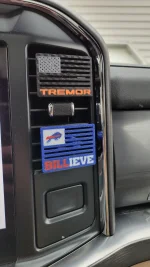
The prototype flag emblem for the vent came out pretty great! Size wise I got the clip really close, it just is a bit longer than needed, but the fitment around the vent blade is nearly perfect. The stars and parts of the letters are too small to come through, but I think they will come out okay with a .2 nozzle. As shown the emblem is 2in wide. The production version will be multicolor for the white part of the flag and the tremor logo with my new carbon fiber effect plate. PETG was on sale so I just ordered more black, orange, and silver. Maybe I will do one with two clips so that the emblem can be centered on the vent. Hopefully parts should be in soon so I can print the next version this week.

EDIT: I am considering selling these in the future, so please do not distribute the files to the rest of the internet. I am sharing for personal use only for forum members. Love to see if anyone makes one.
 

Attachments

Last edited:
Wish I could say I do. It was delivered Jan 17th, but was damaged. Dealing with Creality customer service has been nothing short of a nightmare. On their website chat they said they would replace the printer, and that I should keep the CFS and filament (since I ordered the combo unit). It took 2 weeks for them to give me the shipping label, 1 week transit, then 2 weeks of no contact after it was delivered. Yesterday they said they were partially refunding me, just for the k2+. The amount is less than the list price of another k2+, and then with sales tax on top of that I would be out over 200. I am demanding either a full refund or a k2+ replacement like what they promised. I am soured by the whole situation and really wish I would have bought through Amazon or Best Buy.

Happy to say though that I finished my door pocket trash can. It fits snugly in the door pocket and has a lid that closes on its own. The fit in the door is tight enough that it doesn't slide around while driving. It is within reach from the drivers seat and functions perfectly for straw wrappers, receipts, etc. I was inspired by cup-holder trash cans but thought a custom fit one would be cooler. I used black PLA+ for the prototyping and used PETG for the green one. The black PLA+ actually matches the door pocket really well and blends in. Because I had the green PETG I went with a mini dumpster theme. Dialing in the PETG was a bit tricky. If I was going to make more I would consider ASA instead but would probably have to tweak the size slightly since ASA shrinks a little bit so it might not fit exactly right in the door.
I just cleaned out the passenger side door and was thinking someone needs to design a small trash can that fits in the pocket there so my wife has something to put her trash in rather than just toss it freely…

And lo and behold. What have we here.
 
I just cleaned out the passenger side door and was thinking someone needs to design a small trash can that fits in the pocket there so my wife has something to put her trash in rather than just toss it freely…

And lo and behold. What have we here.
I mean, this is my world we're talkin' bout now. Mini trash cans! Just add a Tremor logo 🤪.


1000016622.webp
 
I just cleaned out the passenger side door and was thinking someone needs to design a small trash can that fits in the pocket there so my wife has something to put her trash in rather than just toss it freely…

And lo and behold. What have we here.
I have not tested this in the passenger side door pocket. I am assuming that it would work if mirrored. I can verify that and let you guys know.

I mean, this is my world we're talkin' bout now. Mini trash cans! Just add a Tremor logo 🤪.
I figured the mini dumpster would be up your alley with your mini theme!
 
Gorange...
How could I make such a devastating mistake?!?

I have not tested this in the passenger side door pocket. I am assuming that it would work if mirrored. I can verify that and let you guys know.
I would assume the same; got my fuel additives in the little measured doses on the driver’s side, so its filled up.

Honestly with the amount of storage pockets there, if I had a printer I’d tinker with turning that whole section into a little trash can. Leave the cup holder and the back half for misc. storage, and the center piece can be that. I mean, I have a little collapsible trash can behind the console that I use, but can’t be turning around I guess. Haha
 
I did not post them anywhere yet, but see the attached for the dumpster models. The lid requires weight inserted so that it closes on it's own. I had it pause mid print so I could insert the weights (the prototype just had them stuck on with the tape). The pause might come through on the 3MF, not sure. I used 3x 1/4 ounce wheel weights. The lid attaches with M3 socket head cap screws. Any length will work, since the entire length of the lid has the cylinder cut. Tapping is not required, the hole is sized so the screw can self tap when screwed in. I used support blocker for the weight cavity and the lid screw hole, not sure if that will come through on the 3MF or not either. Dimensionally it should come out good with PLA or PETG. For ASA, scaling up 1-2% in the slicer may be required. PLA might deform if you live somewhere hot.
I printed one in silver ABS. It came out good, but I have some suggestions. #1 I'm not interested in the top. I want to be able to grab it and dump it in a trash can at a gas station easily. #2 It should be wider to hold more. #3 By accident, the triangular top broke off right away on the skinny side. I broke the other side off to match. I like it better that way. #4 It is too hard to remove it. I think the back top edge needs adjustment so you can easily remove it for dumping. And make it longer while doing that. Anyway, that's the changes I would make. UPDATE thinking more about it: Maybe if I printed it in TPU, after lengthening it and ditching the tringle tops, then it would be easy to remove, and still be snug. I'll print it in TPU to test it, if you want to make those modifications. My wife says she has to be able to remove it easily to clean it, as well.
 
I just ordered a Qidi Plus4 fingers crossed it works good, reviews are good, but the subreddit seems to have a lot of complaints. I am looking to print high temp filaments. also want to work on my 23+ trucks light rings.
 
I printed one in silver ABS. It came out good, but I have some suggestions. #1 I'm not interested in the top. I want to be able to grab it and dump it in a trash can at a gas station easily. #2 It should be wider to hold more. #3 By accident, the triangular top broke off right away on the skinny side. I broke the other side off to match. I like it better that way. #4 It is too hard to remove it. I think the back top edge needs adjustment so you can easily remove it for dumping. And make it longer while doing that. Anyway, that's the changes I would make. UPDATE thinking more about it: Maybe if I printed it in TPU, after lengthening it and ditching the tringle tops, then it would be easy to remove, and still be snug. I'll print it in TPU to test it, if you want to make those modifications. My wife says she has to be able to remove it easily to clean it, as well.
Good points, it is a trade off because the tighter fit is what holds it in place but like you mentioned makes taking it in and out more difficult. I think a looser fit could be had if it was wide enough to contact the aft support in the door pocket. I went with the size it is now because I was trying to keep it proportional to a dumpster, but I think a wider one would work too. I will play around and share a file when I make one.

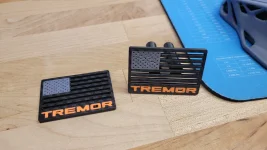
My flag emblems came out okay, not great. Even with the .2mm nozzle, 0.1 layer height, the stars are too small to get definition and getting bed adhesion was difficult. The carbon fiber effect came out nice but it looks a little weird because of how small it is. I may scale it up 120% and see what happens. I might have to change out the stars for something else. The flat back one is intended to be double sided taped to the blank space under the vent in the picture or installed on the dash in a different location on 22 and earlier. I'm not sure what the dash of those looks like and how much space there is available.
Of course it could be made with the silver Tremor instead of the orange for the blackout package folks!
 

Attachments

  • 20250228_130139.webp
    20250228_130139.webp
    92.4 KB · Views: 102
  • 20250228_104213.webp
    20250228_104213.webp
    166.6 KB · Views: 113
  • 20250227_155747.webp
    20250227_155747.webp
    70 KB · Views: 92
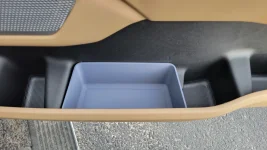
@ScottK , I have made a new version of the trash can that is more in line with what you requested. It is really more of a bin, since it doesn't have a lid. I got rid of the interference fit and it now is pretty close to snug while still being removable. Depending on what material you use and your truck, if you want it to be a little bit easier to remove, subtract a percent or two in the left to right direction (with the door closed). Shown pictured on the passenger side but it is symmetric. Dividers could be added to make this an organizer for things as desired.

I finally got my K2+ sorted out, did a full return on the first one through Creality and ordered a second one from Amazon. Used it to make some flag vent emblems that were Bills themed. I think they came out pretty good with the .4 nozzle and textured bed. Waiting on a carbon fiber texture bed to come in soon. Made several and they fit on the vehicles that friends and family tested.
 

Attachments

@ScottK , I have made a new version of the trash can that is more in line with what you requested. It is really more of a bin, since it doesn't have a lid. I got rid of the interference fit and it now is pretty close to snug while still being removable. Depending on what material you use and your truck, if you want it to be a little bit easier to remove, subtract a percent or two in the left to right direction (with the door closed). Shown pictured on the passenger side but it is symmetric. Dividers could be added to make this an organizer for things as desired.

I finally got my K2+ sorted out, did a full return on the first one through Creality and ordered a second one from Amazon. Used it to make some flag vent emblems that were Bills themed. I think they came out pretty good with the .4 nozzle and textured bed. Waiting on a carbon fiber texture bed to come in soon. Made several and they fit on the vehicles that friends and family tested.
Nice. I'm going to print it soon and post photos. I design stuff as well, but not for the truck, so far. Here's some: https://makerworld.com/en/@SKopper
 
@ScottK , I have made a new version of the trash can that is more in line with what you requested. It is really more of a bin, since it doesn't have a lid. I got rid of the interference fit and it now is pretty close to snug while still being removable. Depending on what material you use and your truck, if you want it to be a little bit easier to remove, subtract a percent or two in the left to right direction (with the door closed). Shown pictured on the passenger side but it is symmetric. Dividers could be added to make this an organizer for things as desired.
20250320_191419.webp

20250320_191454.webp

20250320_191324.webp


I printed it in silver ABS on my Bambu X1C. I turned on normal supports, and they fell off easily. It fits great on both the driver and passenger side. It's a little snug to remove quickly, but easy enough when it needs to be cleaned. I'm printing a second one just like the first one, so we have them in both doors. If anyone wanted it easier to remove, just trim a quarter inch off the back top edge, I think. But I was happy, as is. Thank you!
 

Attachments

Back
Top Bottom