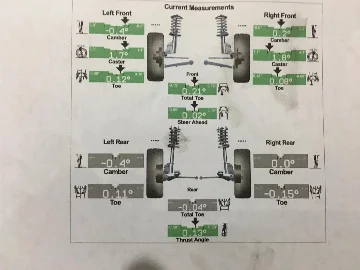
Ok, the LONG anticipated install finally happened and the Super Duty is now APEX Steering Equipped. I used the Synergy Toe brackets to check the factory alignment and recorded the measurement. If you're going to go this route, make SURE you grab some 14mm-1.5 flange nuts to secure the toe-plates to the factory studs instead of an aftermarket cone-style lug. Also, pro-tip, buy two identical high end tape measures. You'd be surprised how much variance you can have between brands.
View attachment 110719
View attachment 110720
The Factory alignment was impressive... Normally, you'll see toe-in of 1/8" or so which i deem excessive on a straight axle truck. This truck was about 1/32" toe in. Pretty much perfect. I was reading 73.25" rear and BARELY discernibly under that in the front. I recorded these measurements and setup the APEX.
View attachment 110721
View attachment 110722
View attachment 110723
I coated the internal threads of the main tubes with a ton of anti-seize and assembled the linkage. Removing the old steering was a breeze. If you're unfamiliar with the process, Remove the steering stabilizer, remove cotter pins from tie-rod ends, loosen the nuts until they're hand tight, smack the joint with a BFH until the taper unseats, remove the nuts, remove the steering.
Laying the factory linkage next to the APEX shows the shear difference in BEEF. The apex linkage must weight 5x the amount. The joints are oversized compared to the factory and the threads are physically larger. The interface to the massive main tube is MUCH stronger as it's not a cheap, sheet-metal adjuster.
View attachment 110724
Icing on the cake, APEX has engineered more misalignment into the tie-rod ends. This is huge for people with Carli 5.5" Kits. At full droop, the factory linkage is maxed. If your ends aren't perfectly parallel, you can actually see a bend in drag link from it binding. With the additional range of motion of the APEX, this is a non-issue. At full droop of my 5.5" E-Venture, i could grab and roll the drag link with no binding of the joints.
View attachment 110725
View attachment 110726
I then threw the linkage on and snugged the tie-rod end nuts so i could set the toe.
View attachment 110727
Once that was done, i torqued the tie-rod ends and used red loctite and tightened the jam nuts to about 300lb/ft to secure them. APEX provides "Ninja" washers to keep the jam nuts from backing off. Frankly, i think these are provided to make the linkage "idiot proof" as so many people screw up jam-nuts. I know how to torque them and loctite them - this method has never failed me so i threw the ninja washers in the trash.
View attachment 110728
With the Tie-Rod torqued and jam nuts set, i triple checked the toe and all was well. I then adjusted the drag link making sure, with the truck keyed on, i could cycle the new steering lock to lock (until the knuckles hit the steering stops on both sides). All was well so i installed my Carli high and low mount steering stabilizers. APEX provided me a clamp for the lower that fit perfectly. The 1/2"-13 thread pitch of the Carli-Specific clamp fit our high-misalignment stud and made for a very simple install.
View attachment 110729
They engineered the stabilizer mount for the upper position into the drag-link tie-rod end. Our saddle for the Carli high mount fit perfect but, the pad being so thick, we had to go 1/4" longer on the hardware to grab the nyloc (Carli provides a 2.5" bolt, i needed a 2.75").
View attachment 110730
View attachment 110731
Last, i set the truck on the ground, straightened the steering wheel and locked the drag-link jam nuts down. A trick of the trade: to ensure maximum roll/misalignment and no binding of the linkage, always max both tie-rods at both ends in the direction you're torquing the linkage. As these jam nuts torqued by pushing the wrench toward the front of the vehicle, i would max both tie-rods to the rear of the vehicle when torquing the nuts, then roll the linkage forward to ensure it had full range of motion.
Last, double checked all torque specs, inserted cotter pins, threaded in zerk fittings, greased all tie-rod ends, and recharged my Carli Stabilizers to 200psi each.
View attachment 110732
My impressions - it's a really nice kit. It went together without a hitch, adjusted easy, runs an oversized OEM style ball joint/tie-rod instead of an exposed heim, the linkage is forged for strength, the geometry is built into the ends instead of the tubes so it doesn't flop under load, it's greasable and all ends are replaceable without replacing the main tubes, it has more misalignment that the factory linkage making it better for lifted applications and performance suspensions, and it has held up to the abuse of my long-travel Ram with 40" tires and hydro assist so i don't feel I'll have an issue here!
As I've received a ton of questions on it, i thought I'd post about it.




shop.carlisuspension.com







![What did you do to your Tremor today? [2025 edition]](https://www.fordtremor.com/data/files/featured_images/featuredimages_thumb_2.webp?1792070090)