Upfitter Wiring Harness Discussion

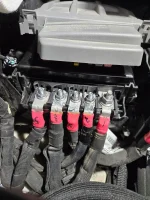
View attachment 182488Got it installed just now. Quality is great, install fairly simple. I was able to ground it to the frame on the factory ground location by routing the wire around the backside where it wont interfere with the hydraulic piston for the hood and harness just lays on top of the grey fuse box.

Thanks for this photo. I have the kit on the way. Also an electrical novice. Those red wires are the ones that connect to the upfitter leads Ford gave us, correct? There doesn't seem to be a lot of room to get a crimping tool and a heat gun in there...?
 
Thanks for this photo. I have the kit on the way. Also an electrical novice. Those red wires are the ones that connect to the upfitter leads Ford gave us, correct? There doesn't seem to be a lot of room to get a crimping tool and a heat gun in there...?
Yea the red wires connect to the vehicle upfitter wires, pull out the upfitter fuse box. There are clips you can undo with a flathead screwdriver and you can give yourself a little more room to work. It’s not too bad. Once you get it all connected then you can tuck the wires back in and reattach the fuse box.
 
Last edited:
As said above. You can pull the fuse box up a lot and turn it sideways so you have tons of room to do the connections. I installed mine yesterday. Very easy to do and going to much easier to add stuff moving forward.
 
@Cblaxx19 I have the OG version 1. I still haven’t installed mine yet. Anyways, I was wondering if I can get 4 more caps and might as well get the butt connectors (22, 24, or possibly 30) too to use instead of the solder fittings.

On another note the original only came with the 6 male connectors. Should I also get the 4 remaining male connectors for the 3 PTO’s and the B+?

Has anyone came up with a use for the PTO wires that don’t have a PTO installed. I have the BD designs high idle kit that uses some of the PTO wires in the kick panel in the cab if that makes a difference. I’ve read some of you have used the B+ wire for a hot wire for accessories. So maybe I just need to order one more male connector for the B+ wire only if the PTO wires can’t be used for anything else.
 
@Cblaxx19 I have the OG version 1. I still haven’t installed mine yet. Anyways, I was wondering if I can get 4 more caps and might as well get the butt connectors (22, 24, or possibly 30) too to use instead of the solder fittings.

On another note the original only came with the 6 male connectors. Should I also get the 4 remaining male connectors for the 3 PTO’s and the B+?

Has anyone came up with a use for the PTO wires that don’t have a PTO installed. I have the BD designs high idle kit that uses some of the PTO wires in the kick panel in the cab if that makes a difference. I’ve read some of you have used the B+ wire for a hot wire for accessories. So maybe I just need to order one more male connector for the B+ wire only if the PTO wires can’t be used for anything else.
I do not currently have any caps or butt connectors so sell separately.

you can get them from here though:
Caps: https://www.customconnectorkits.com/collections/series-metri-pack-630/products/12033731
Butt Splices: https://www.customconnectorkits.com/collections/all-butt-splices/products/10313

i only included the pigtail connectors for the 6 main connections as it seemed somewhat sparse in people using the PTO and B+ connections.
you can get pigtails from amazon though: https://www.amazon.com/Pigtail-Metr...fix=metripak+630+ppigtail,aps,126&sr=8-1&th=1

whoever ordered a harness overnight was the last lucky person to get theirs for the year. i just packed it and will drop it at UPS on my way to the airport in a little while.

Thanks again for all of the support! looking forward to helping solve more problems you all come up with next year!

Cory
 
Thanks for this photo. I have the kit on the way. Also an electrical novice. Those red wires are the ones that connect to the upfitter leads Ford gave us, correct? There doesn't seem to be a lot of room to get a crimping tool and a heat gun in there...?

@cs0430 Here is a video showing how to get the fuse box out; I don't think I would ever wire something the way he did, but he does a good job showing the fuse box removal. I hope this helps.

 
@cs0430 Here is a video showing how to get the fuse box out; I don't think I would ever wire something the way he did, but he does a good job showing the fuse box removal. I hope this helps.

Super helpful video, thank you! Surprised Ford doesn't label the wires Aux 1, 2, 3, etc.

This is in the manual for 2024 SD's. Probably a "trust but verify" situation:

1734108620154.webp
 
Last edited:
Getting in touch with my OCD :eek:
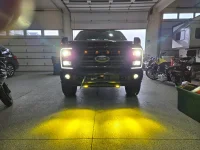
OEM fog lights don’t really cut it in heavy for, added Trail Guard with a pair of Baja Designs S2 Pro Amber Driving/Combo lights.
@Cblaxx19 Upfitter Harness was key to successful install, like to share some lessons learned for those who have 2024 F250 Tremor with Warn Winch:
  • Do not use the harness included with the lights it’s set up with a relay, fuse, independent on/off switch – not designed for use with upfitter switch
  • Purchase the Baja Designs 55” splitter and upfitter harness – these connect the pair of S2’s to a single plug with the upfitter harness Nick@ApolloOff-Road
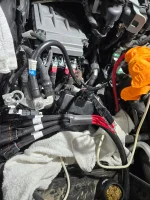
Frustrated with lack of working room, I completely removed air filter housing, battery and battery tray. Marked the terminals on the main fuse box 1-5, then removing them had enough working room to connect the upfitter harness.
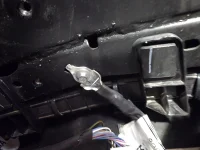
I ran the upfitter harness ground to the behind the terminal wires connecting to the battery ground closest to the fuse box, grounded to the frame.
Connected the Baja Designs upfitter wiring harness to Upfitter Harnes and their 55”splitter now Aux 1 upfitter switch powers both S2 Pros
 

Attachments

  • FuseBoxTermials.webp
    FuseBoxTermials.webp
    329.9 KB · Views: 131
  • UpfitterHarnessConnected.webp
    UpfitterHarnessConnected.webp
    320.9 KB · Views: 129
  • UpfitterHarnessGround_Loctaion.webp
    UpfitterHarnessGround_Loctaion.webp
    107.9 KB · Views: 129
  • BigDifference.webp
    BigDifference.webp
    315.5 KB · Views: 129
No heating anymore. Switched out the solder shrinks to crimp connectors because people didn’t like the solder. Just crimp and apply the heat shrink.
What crimp connectors are everyone using with the two different wire sizes?
 
I haven't installed my harness yet as I know it will be tight to get in there.
 
I ordered a set today. Looking forward to to installing. I have some good heat shrink splicers and wrap. Anyone soldering them instead of splicers?
 
I ordered a set today. Looking forward to to installing. I have some good heat shrink splicers and wrap. Anyone soldering them instead of splicers?
A properly done crimp is better than a solder joint in areas subject to vibration. He gives you a nice non insulated butt connector so you can get a good crimp if you have a good tool. Plus a small piece of shrink cut to size. Very well made kit and the short factory leads would be a pain to solder. But no one is stopping you if that's what you like.
 
A properly done crimp is better than a solder joint in areas subject to vibration. He gives you a nice non insulated butt connector so you can get a good crimp if you have a good tool. Plus a small piece of shrink cut to size. Very well made kit and the short factory leads would be a pain to solder. But no one is stopping you if that's what you like.
Thanks for the reply, I have some great wire fly splicers and shrink wrap.
 
I haven't installed my harness yet as I know it will be tight to get in there.
it's a very tight fit - see that you have 7.3, you may not have to do what I did on my 6.7 with dual batteries and OEM winch - from my earlier post - completely removed air filter housing, battery and battery tray. Marked the terminals on the main fuse box 1-5, then removing them had enough working room to connect the upfitter harness.
I ran the upfitter harness ground to the behind the terminal wires connecting to the battery ground closest to the fuse box, grounded to the frame.
 
it's a very tight fit - see that you have 7.3, you may not have to do what I did on my 6.7 with dual batteries and OEM winch - from my earlier post - completely removed air filter housing, battery and battery tray. Marked the terminals on the main fuse box 1-5, then removing them had enough working room to connect the upfitter harness.
I ran the upfitter harness ground to the behind the terminal wires connecting to the battery ground closest to the fuse box, grounded to the frame.
I have the 7.3 with single battery. Hopefully, I can manage it nicely as I have BD Pros, BD Back lights and rock lights upcoming in the near future.
 
There’s plenty of space with the 7.3, and multiple easy to reach ground points.
 
I just pulled the upfitter assembly out and made the connections on my bench. It was much easier than the gymnastics of making all the connections on those short wires leaning over the hood. There is a video on YT showing how to remove it - very simple and worth the effort to do it that way.
 
I just pulled the upfitter assembly out and made the connections on my bench. It was much easier than the gymnastics of making all the connections on those short wires leaning over the hood. There is a video on YT showing how to remove it - very simple and worth the effort to do it that way.

Seems like a nice method. Can you share a link? I've seen a fair number of videos of releasing the tabs and pulling the box off the bracket to access the upfitter wires underneath, but none that have gone so far as to disconnect the box entirely to remove it from under the hood. I've not pulled mine yet, so haven't looked to see what all wires would need to be pulled. Always nice to see a video prior to starting the work. Is it a wire connector or two that gets unclipped, a cable terminal and some bolts, etc.? Thanks.
 
Seems like a nice method. Can you share a link? I've seen a fair number of videos of releasing the tabs and pulling the box off the bracket to access the upfitter wires underneath, but none that have gone so far as to disconnect the box entirely to remove it from under the hood. I've not pulled mine yet, so haven't looked to see what all wires would need to be pulled. Always nice to see a video prior to starting the work. Is it a wire connector or two that gets unclipped, a cable terminal and some bolts, etc.? Thanks.
link to removing Upfitter fuse box for 2023 Super Duty

On my 2024 6.7 with dual batteries I would have like removing the upfitter fuse box, but the connecting wiring harness was "burried" beneath thre other major connectioins :eek:
 
link to removing Upfitter fuse box for 2023 Super Duty

On my 2024 6.7 with dual batteries I would have like removing the upfitter fuse box, but the connecting wiring harness was "burried" beneath thre other major connectioins :eek:

Thanks. That is one of the several videos I've previously watched that shows how to pop the box off the bracket so you can twist the box to access the upfitter pigtails while it's still in the truck. But @Mad_Max said there is a video to completely remove the box from the truck so you can do all the crimping on your workbench rather than under the hood. Curious to see what is involved in completely removing the box from under the hood to decide if that is worth it so one can do all the crimping on the bench rather than hunched under the hood.
 
Back
Top Bottom