Thought Some of Ya'll Might Be Interested In This Dash Camera Option

Great info, thank you.

Two questions for you (OK, one's a multi-part question).

First, I have an existing rearview camera on my camper, that actually ties into my 360 degree system (I no longer have the factory bed installed and the OEM camera is relocated to my camper). Do you know if any system can utilize the camera I already have looking rearwards? I'd prefer to not have to add another camera dedicated to a system like this.

Second, I looked at the User Ratings on Google play for the apps for these dashcams and the ratings are not impressive. I know it's very subjective, and operator dependent, but do you have any inputs on the apps associated with the three brands / models that you recommended? I definitely geek-out with technology, but if actually using the systems is a PITA, I won't be happy in the long run.

VIOFO 2.6 stars (2.25K reviews)
Blackvue 3.2 stars (9.05K reviews)
Thinkware 1.8 stars (1.2K reviews)

thanks,
Herb
PM me and I'll give you my cell and we can connect. can't go by the reviews really when it comes to dash cams. As an aside, I run Viofo in all of my vehicles.
 
To second security guy, Viofo would be my pick for top of the line quality. It’s the one (A329) that I’d be running if I wasn’t giving this one a try to see the quality vs. OEM fit trade-offs.

Thinkware is right up there, maybe a hair less video quality but you pay for a bunch of added cloud features that might or might not offer you any value (collision alerts, speed alerts, etc that’s already baked into these trucks).

The apps are all pretty meh, so it’s more if you can do what you need to do with it rather than how smooth it looks.

Blackvue I have no experience with, so can’t say either way. And unfortunately can’t speak to something that would integrate your existing camera.
 
To second security guy, Viofo would be my pick for top of the line quality. It’s the one (A329) that I’d be running if I wasn’t giving this one a try to see the quality vs. OEM fit trade-offs.

Thinkware is right up there, maybe a hair less video quality but you pay for a bunch of added cloud features that might or might not offer you any value (collision alerts, speed alerts, etc that’s already baked into these trucks).

The apps are all pretty meh, so it’s more if you can do what you need to do with it rather than how smooth it looks.

Blackvue I have no experience with, so can’t say either way. And unfortunately can’t speak to something that would integrate your existing camera.
Thanks for the reply. Unfortunately, there are no dash cameras out there that can integrate with an existing vehicle camera. You would think this would be a GREAT option for manufacturers to offer since we have so many damn cameras in these vehicles. Like what Tesla does!
 
Thanks for the reply. Unfortunately, there are no dash cameras out there that can integrate with an existing vehicle camera. You would think this would be a GREAT option for manufacturers to offer since we have so many damn cameras in these vehicles. Like what Tesla does!
Exactly. These trucks have 360 cameras that are pretty decent. Heck, if you have the tailgate down cam, you can have a sky view too. Would be so much nicer to plug a USB or SSD into the dash and get that as your feeds. Ford could offer it as an option to replace the useless wireless charger in the console cubby.
 
Thanks for the reply. Unfortunately, there are no dash cameras out there that can integrate with an existing vehicle camera. You would think this would be a GREAT option for manufacturers to offer since we have so many damn cameras in these vehicles. Like what Tesla does!

That would be ideal. I have a Model S Plaid and the dash cam/security cam system works great. Basically, insert a thumb drive and configure how you want. You can call up 4 separate cameras and honk flash or fart at people remotely. You even speak in real time through the exterior speaker. That system and phone key system are the two features I most wish Ford would adopt some version of for the Super Duty.

Just called this photo up from the Tesla at home in the garage while I sit at my desk in my office.

IMG_6218.webp
 
That would be ideal. I have a Model S Plaid and the dash cam/security cam system works great. Basically, insert a thumb drive and configure how you want. You can call up 4 separate cameras and honk flash or fart at people remotely. You even speak in real time through the exterior speaker. That system and phone key system are the two features I most wish Ford would adopt some version of for the Super Duty.

Just called this photo up from the Tesla at home in the garage while I sit at my desk in my office.

View attachment 250439
How bad does the fart smell?
 
After consideration I ended up going with the FitcamX.
A few driving factors:
  1. Amazon briefly went out of stock of the Sapium front + rear combo. A day later they were back but delivery was out a month+ (and I didnt want to wait..). Still showing April 10-30 on Amazon.
  2. Amazon is the only place you can find the Sapium one. They dont have a website and no other search references this brand.
  3. Fear of the pulsing blue light. haha
  4. I prefer the centered view of the FitcamX over the offset view of the Sapium. Which would probably also interfere with my EZ-Pass. In it's current location the rearview mirror blocks it from my view.
There are a few compromises
  1. the Sapium can hold a larger SD car up to 1TB while Fitcamx can only do 256Gb. Which kind of sucks.
  2. Fitcamx accessories you have to buy separately.

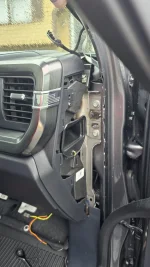
I did follow the Sapium install video for routing the cables. However, I did take the passenger side A-Pillar off for hardwiring. I bought their harness so I could utilize park mode (needs a constant 12v). If you cut the OBD2 connector from the Sapium you could use this method (like discussed earlier).

Using the 2023 F350 Fuse Box Diagram and my multi meter, I ended up using Fuse Taps in the the interior fuse box under the glove box.

THE FUSE BOX IS UPSIDE DOWN IN THE TRUCK COMPARED TO THE DIAGRAM. This makes it extra confusing.

ACC : Fuse 36 (Manual Shift)
PWR + : Fuse 25 (Spare)
1774219581034.webp
1774219554695.webp


I would have used Fuse 13 (spare) for ACC but the wire leaving the tap for the constant PWR+ was in the way. And you want the Load side (connects to the accessory) of the circuit on the wire side. The other side of the fuse is the 12v Power side. If you plug these in wrong your acc load is added to the original fuse and not the new one. (Image below from clavicus on Maverick Forums)
1774219177538.webp


From the truck view of things. The constant 12v pwr and the acc pwr are on opposing sides. I verified this with the multimeter before inserting any fuses. You should also do the same!! Plug in the tap w/o fuses and verify which side gets power.

Also note there are 3 push tabs on the side of the fuse box that let you rotate down the box to work with it easier. One on the left and 2 on the rear side (seat side) (top of this image as it rotates down toward you).
1774219355190.webp

Used this post here for the ground
1774220092816.webp


There are convenient clips already part of the OEM clips that you can route the wire down.
1774220302933.webp


Use the multi bend pick to pop the handle cover off so you dont scratch the trim piece. I used the 90* first and scratched it. But the material is weird and you can smooth is back out with the round part (side). That tiny hole is OEM.
1774220398897.webp
1774220484649.webp
1774220531494.webp
1774220560609.webp


How I routed the cables. Black is power and the Gray is the rear cam.
1774220864439.webp

All 3 wires fit in the OEM hole on the black plastic cover
1774220966363.webp

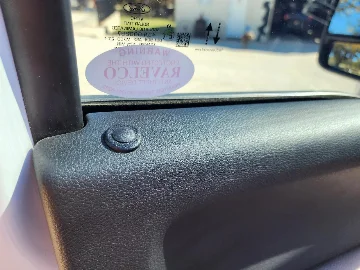
Rear cam on the drivers side as the power window would cover the passenger side.
1774220270147.webp
 

Attachments

  • 1774220475271.webp
    1774220475271.webp
    134.7 KB · Views: 22
After consideration I ended up going with the FitcamX.
A few driving factors:
  1. Amazon briefly went out of stock of the Sapium front + rear combo. A day later they were back but delivery was out a month+ (and I didnt want to wait..). Still showing April 10-30 on Amazon.
  2. Amazon is the only place you can find the Sapium one. They dont have a website and no other search references this brand.
  3. Fear of the pulsing blue light. haha
  4. I prefer the centered view of the FitcamX over the offset view of the Sapium. Which would probably also interfere with my EZ-Pass. In it's current location the rearview mirror blocks it from my view.
There are a few compromises
  1. the Sapium can hold a larger SD car up to 1TB while Fitcamx can only do 256Gb. Which kind of sucks.
  2. Fitcamx accessories you have to buy separately.

I did follow the Sapium install video for routing the cables. However, I did take the passenger side A-Pillar off for hardwiring. I bought their harness so I could utilize park mode (needs a constant 12v). If you cut the OBD2 connector from the Sapium you could use this method (like discussed earlier).

Using the 2023 F350 Fuse Box Diagram and my multi meter, I ended up using Fuse Taps in the the interior fuse box under the glove box.

THE FUSE BOX IS UPSIDE DOWN IN THE TRUCK COMPARED TO THE DIAGRAM. This makes it extra confusing.

ACC : Fuse 36 (Manual Shift)
PWR + : Fuse 25 (Spare)
View attachment 250615 View attachment 250614

I would have used Fuse 13 (spare) for ACC but the wire leaving the tap for the constant PWR+ was in the way. And you want the Load side (connects to the accessory) of the circuit on the wire side. The other side of the fuse is the 12v Power side. If you plug these in wrong your acc load is added to the original fuse and not the new one. (Image below from clavicus on Maverick Forums)
View attachment 250612

From the truck view of things. The constant 12v pwr and the acc pwr are on opposing sides. I verified this with the multimeter before inserting any fuses. You should also do the same!! Plug in the tap w/o fuses and verify which side gets power.

Also note there are 3 push tabs on the side of the fuse box that let you rotate down the box to work with it easier. One on the left and 2 on the rear side (seat side) (top of this image as it rotates down toward you).
View attachment 250613
Used this post here for the ground
View attachment 250617

There are convenient clips already part of the OEM clips that you can route the wire down.
View attachment 250619

Use the multi bend pick to pop the handle cover off so you dont scratch the trim piece. I used the 90* first and scratched it. But the material is weird and you can smooth is back out with the round part (side). That tiny hole is OEM.
View attachment 250620View attachment 250622View attachment 250623View attachment 250624

How I routed the cables. Black is power and the Gray is the rear cam.
View attachment 250625
All 3 wires fit in the OEM hole on the black plastic cover
View attachment 250626
Rear cam on the drivers side as the power window would cover the passenger side.
View attachment 250618
Nice!
 
After consideration I ended up going with the FitcamX.
A few driving factors:
  1. Amazon briefly went out of stock of the Sapium front + rear combo. A day later they were back but delivery was out a month+ (and I didnt want to wait..). Still showing April 10-30 on Amazon.
  2. Amazon is the only place you can find the Sapium one. They dont have a website and no other search references this brand.
  3. Fear of the pulsing blue light. haha
  4. I prefer the centered view of the FitcamX over the offset view of the Sapium. Which would probably also interfere with my EZ-Pass. In it's current location the rearview mirror blocks it from my view.
There are a few compromises
  1. the Sapium can hold a larger SD car up to 1TB while Fitcamx can only do 256Gb. Which kind of sucks.
  2. Fitcamx accessories you have to buy separately.

I did follow the Sapium install video for routing the cables. However, I did take the passenger side A-Pillar off for hardwiring. I bought their harness so I could utilize park mode (needs a constant 12v). If you cut the OBD2 connector from the Sapium you could use this method (like discussed earlier).

Using the 2023 F350 Fuse Box Diagram and my multi meter, I ended up using Fuse Taps in the the interior fuse box under the glove box.

THE FUSE BOX IS UPSIDE DOWN IN THE TRUCK COMPARED TO THE DIAGRAM. This makes it extra confusing.

ACC : Fuse 36 (Manual Shift)
PWR + : Fuse 25 (Spare)
View attachment 250615 View attachment 250614

I would have used Fuse 13 (spare) for ACC but the wire leaving the tap for the constant PWR+ was in the way. And you want the Load side (connects to the accessory) of the circuit on the wire side. The other side of the fuse is the 12v Power side. If you plug these in wrong your acc load is added to the original fuse and not the new one. (Image below from clavicus on Maverick Forums)
View attachment 250612

From the truck view of things. The constant 12v pwr and the acc pwr are on opposing sides. I verified this with the multimeter before inserting any fuses. You should also do the same!! Plug in the tap w/o fuses and verify which side gets power.

Also note there are 3 push tabs on the side of the fuse box that let you rotate down the box to work with it easier. One on the left and 2 on the rear side (seat side) (top of this image as it rotates down toward you).
View attachment 250613
Used this post here for the ground
View attachment 250617

There are convenient clips already part of the OEM clips that you can route the wire down.
View attachment 250619

Use the multi bend pick to pop the handle cover off so you dont scratch the trim piece. I used the 90* first and scratched it. But the material is weird and you can smooth is back out with the round part (side). That tiny hole is OEM.
View attachment 250620View attachment 250622View attachment 250623View attachment 250624

How I routed the cables. Black is power and the Gray is the rear cam.
View attachment 250625
All 3 wires fit in the OEM hole on the black plastic cover
View attachment 250626
Rear cam on the drivers side as the power window would cover the passenger side.
View attachment 250618

The impressive part is you did all this in the rain!
 
After consideration I ended up going with the FitcamX.
A few driving factors:
  1. Amazon briefly went out of stock of the Sapium front + rear combo. A day later they were back but delivery was out a month+ (and I didnt want to wait..). Still showing April 10-30 on Amazon.
  2. Amazon is the only place you can find the Sapium one. They dont have a website and no other search references this brand.
  3. Fear of the pulsing blue light. haha
  4. I prefer the centered view of the FitcamX over the offset view of the Sapium. Which would probably also interfere with my EZ-Pass. In it's current location the rearview mirror blocks it from my view.
There are a few compromises
  1. the Sapium can hold a larger SD car up to 1TB while Fitcamx can only do 256Gb. Which kind of sucks.
  2. Fitcamx accessories you have to buy separately.

I did follow the Sapium install video for routing the cables. However, I did take the passenger side A-Pillar off for hardwiring. I bought their harness so I could utilize park mode (needs a constant 12v). If you cut the OBD2 connector from the Sapium you could use this method (like discussed earlier).

Using the 2023 F350 Fuse Box Diagram and my multi meter, I ended up using Fuse Taps in the the interior fuse box under the glove box.

THE FUSE BOX IS UPSIDE DOWN IN THE TRUCK COMPARED TO THE DIAGRAM. This makes it extra confusing.

ACC : Fuse 36 (Manual Shift)
PWR + : Fuse 25 (Spare)
View attachment 250615 View attachment 250614

I would have used Fuse 13 (spare) for ACC but the wire leaving the tap for the constant PWR+ was in the way. And you want the Load side (connects to the accessory) of the circuit on the wire side. The other side of the fuse is the 12v Power side. If you plug these in wrong your acc load is added to the original fuse and not the new one. (Image below from clavicus on Maverick Forums)
View attachment 250612

From the truck view of things. The constant 12v pwr and the acc pwr are on opposing sides. I verified this with the multimeter before inserting any fuses. You should also do the same!! Plug in the tap w/o fuses and verify which side gets power.

Also note there are 3 push tabs on the side of the fuse box that let you rotate down the box to work with it easier. One on the left and 2 on the rear side (seat side) (top of this image as it rotates down toward you).
View attachment 250613
Used this post here for the ground
View attachment 250617

There are convenient clips already part of the OEM clips that you can route the wire down.
View attachment 250619

Use the multi bend pick to pop the handle cover off so you dont scratch the trim piece. I used the 90* first and scratched it. But the material is weird and you can smooth is back out with the round part (side). That tiny hole is OEM.
View attachment 250620View attachment 250622View attachment 250623View attachment 250624

How I routed the cables. Black is power and the Gray is the rear cam.
View attachment 250625
All 3 wires fit in the OEM hole on the black plastic cover
View attachment 250626
Rear cam on the drivers side as the power window would cover the passenger side.
View attachment 250618
I really need to finish mine up; been having a nightmare with fusetaps; ordering micros and minis and low profiles keep showing up. 😂 I’ll likely switch plans now off the Spare #13 now that you point out the fit issue.

I’ve shared it a couple of other places, but if you have access to a 3D Printer, https://www.printables.com/model/746140-ford-super-duty-interior-fuse-box-cover works nicely to re-cover the fuse box and had a passthru for the wires.

IMG_0633.webp
IMG_0635.webp
 
@mattagc Funny enough my Fuse cover was actually missing! I found one on Ebay for $20 shipped. Tracking down / figuring out what that p/n took soooo long.

Eng Part Number: PU5T-14A003-DA (what is printed on the cover)
Service Part Number: PU5Z-14A003-DA (the look up p/n to buy it)

But yes I do have a Bambu P2S and Solidworks. I was going to modify the ebay one. But I'll give the 3D one a go since it sounds like extra height is needed. Will probably us PETG instead of the PLA he recommended as it is a better material for automotive parts and won't melt/distort in a hot car like PLA can. Thank you for providing a link. As for the one I ordered, at least I'll have the OEM one to fall back on if I take the camera out.

As for Fuse 13 the fuse tap would have to rotate 90* from what I have pictured to utilize that 7.5A fuse socket. The fuses themselves will interfere with yellow wire / strain relief. But it is possible I just didnt want to stress out the wire by bending it too much.
 
Need someone to print me one please!
 
Just finished up mine; seems to be working good. Will have to play with some settings to find the optimal parking mode, but it's working. Took an embarrassingly long time to figure out why my unit wasn't receiving power from the fusetaps though. Tested fuses, fuse taps, connectivity, cycled truck on and off to test accy and voltages. Nothing's working. About to tear it down because it's a DOA unit...and I notice the damn power cable unplugged from the dongle... :mad::ROFLMAO:
 
Need someone to print me one please!
I ended up finding someone local to me in the community FB group to print mine; he banged it off in a morning.

If you do print it, it might be worth deepening in the notch a hair for the two wires, its a snug fit with two fusetaps coming out of it.
 
How does this compare to the wolfbox? Has anyone used both and prefer one over the other?
 
How does this compare to the wolfbox? Has anyone used both and prefer one over the other?
The Wolfbox is a niche dash cam and not mainstream. Many "professionals" don't like them for several reasons. If you like the idea of the Wolfbox then get one. You won't be disappointed with its overall capabilities. If you want a higher quality camera, look at the VIOFO A329S, the Blackvue, and Thinkware models. Based on your needs and budget, at the end of the day, they are all solid cameras.

You can do some research here at www.thedashcamstore.com (I have no affiliation with this site...good people, knowledgeable, and fair prices)
 
Worked great! Wish the guy supplied the STEP file and not just the STL. Can't really modify an STL afaik
Unless you go through a grueling process with mesh/surfaces to make it solid..

1774394825622.webp

1774394838030.webp
 
Back
Top Bottom