Project Shadowfax

Ok, finally got the right size pipe in and thus some things installed! (Phone not in picture as it was taking the picture.)

View attachment 122492

Initial thoughts:

Overall idea is sound. Positioning of phone and InReach are perfect, as is the mounting flexibility. Visibility loss is minimal, exactly as I wanted.

Problematic is the flexibility of PVC pipe. Even at over 1” OD it bounces a fair bit while driving. And it’s clear it’s the pipe, not the mounts.

Two possible solutions to that:
  1. Add a suction cup mount at each end to support the pipe. Upside is forces from the weight become even less of a concern as the ends are supported. Downside is further visibility loss around the A pillars.
  2. Move to metal pipe. Pro’s and con’s are the opposite of the suction cups. Pipe will be notably heavier, thus increasing forces on the mounts. But visibility will be retained.
Not going to rush to a solution as it’s functional as-is, but I will improve it in the future.
Ok, a bit different setup then yours, but my solution may work for you... I have the same RAM phone mount as you and then a Garmin mount, both on dual arms mounted to the Builtright bracket. I used the dual arms to get each accessory tucked into the notch between the 12" screen and the dash as low as possible. They are fairly solid but will bounce if I hit some rough pavement, dirt road, etc. I adjusted both down so they are line on line with the dash and then wedged in a piece of rubber mat between the two surfaces (dash and arm). So now there is a bit of preload and they don't move nearly as much. It is application of the concept of interference priority - if you can't keep two parts from touching, either physically connect them or control the way they come into contact.
 
What do you think about going with aluminum pipe?

Not sure what shipping would cost, but a piece of pipe doesn't look too pricey: https://www.onlinemetals.com/en/buy...le-40-aluminum-pipe-6061-t6-extruded/pid/1221
That's a good call! That specific website is $20 for shipping to me, so total cost is about $50. Not exactly cheap, but also not insane considering the cost of the whole project.

Will research this more. Thanks!

Ok, a bit different setup then yours, but my solution may work for you... I have the same RAM phone mount as you and then a Garmin mount, both on dual arms mounted to the Builtright bracket. I used the dual arms to get each accessory tucked into the notch between the 12" screen and the dash as low as possible. They are fairly solid but will bounce if I hit some rough pavement, dirt road, etc. I adjusted both down so they are line on line with the dash and then wedged in a piece of rubber mat between the two surfaces (dash and arm). So now there is a bit of preload and they don't move nearly as much. It is application of the concept of interference priority - if you can't keep two parts from touching, either physically connect them or control the way they come into contact.
Great advice and something I also started looking into. One thing I started trying was pushing the pipe up until it hit the windshield, firmly, to hold it in place.

Part of the challenge is the pipe is bending notably under the weight of the phone and InReach. This means the pipe is in a fairly different place depending on whether the devices are present or not. Makes it more difficult to keep it under pressure.
 
Ok, finally got the right size pipe in and thus some things installed! (Phone not in picture as it was taking the picture.)

View attachment 122492

Initial thoughts:

Overall idea is sound. Positioning of phone and InReach are perfect, as is the mounting flexibility. Visibility loss is minimal, exactly as I wanted.

Problematic is the flexibility of PVC pipe. Even at over 1” OD it bounces a fair bit while driving. And it’s clear it’s the pipe, not the mounts.

Two possible solutions to that:
  1. Add a suction cup mount at each end to support the pipe. Upside is forces from the weight become even less of a concern as the ends are supported. Downside is further visibility loss around the A pillars.
  2. Move to metal pipe. Pro’s and con’s are the opposite of the suction cups. Pipe will be notably heavier, thus increasing forces on the mounts. But visibility will be retained.
Not going to rush to a solution as it’s functional as-is, but I will improve it in the future.
I'm curious why you went PVC verses EMT conduit which is still light but more rigid?
 
I'm curious why you went PVC verses EMT conduit which is still light but more rigid?
I mainly decided between metal and PVC (broad categories). PVC has some benefits:
  • Black by nature, requiring no painting. I want it black to reduce reflections from the sun, which impacts visibility.
  • Easy to work with. As someone not setup to do metal work, it's a lot more approachable to cut holes in, run self-tapping screws into, and so forth (running wires, hard-mounting speakers, etc), all without creating ultra sharp edges that need to be cleaned up. All things that can be done with metal, just not as natural for me.
Of course hindsight is 20:20 and I didn't realize just how flexible PVC is, nor that it would form a permanent bend due to the heat of the sun (it's done that now), so metal was clearly the better choice looking back. :)

EMT Conduit is a good option for metal, too! I'll be looking more into that. Thank you!
 
Why not use a carbon fiber pipe/tube?

Looks like a ~1" × ~3' tube would run ~$25–$100 depending on desired wall thickness and whether your sourcing from somewhere like McMaster-Carr or from Amazon.
 
Last edited:
Why not use a carbon fiber pipe/tube?

Looks like a ~1" × ~3' tube would run ~$25–$100 depending on desired wall thickness and whether your sourcing from somewhere like McMaster-Carr or from Amazon.
Hm, that's an interesting idea. I'm running more like 4.5 feet long, but it would be rigid and lightweight.

I don’t think carbon fiber is suitable for a submersible. Oh wait different topic, sorry.
Hey now, Shadowfax hasn't had the leak leading to water under the carpet! :p
 
Well, I swung by Home Depot and picked up some EMT. Ended up getting 1” since that’s the inside diameter, so the outside diameter is right at the minimum of the of the RAM Mount clamps I have.

1 1/4” inside diameter was the next step up, but that put the outside diameter right at the upper edge of the clamps. Figured the smaller diameter is lighter and it’s easier to add thickness if I needed it than remove thickness.

Now, perhaps there’s a technically better solution. But this one wins for ease of availability and it works.

As for performance: way, way better than the PVC. Night and day difference. Solved the flexing problem entirely! Thank you for the suggestion, @Gunslinging_Patriot!

To emphasize the problem the PVC was becoming, it also turns out PVC will happily bend in the heat. I thoroughly did not understand how not rigid PVC is. Here’s the PVC after I pulled it out:

IMG_0466.jpeg


Now, I said EMT conduit solved the flexing problem entirely. Unfortunately it did not solve the movement problem entirely. And this one is on me.

When I was removing the tray in the upper dash to install the BuiltRight mount, I thought the tray was held in by clips at the end closest to the driver. I didn’t watch the video I was referencing closely enough. In actuality you remove two bolts at the front of the tray, then that end lifts out and the other end is hooked into place.

Well, not realizing this, I pried at the end opposite the bolts till something gave. Because we all know there’s been clips hold like crazy. Then realized the bolts and pulled the tray out. Thought I got away with it as the hooks weren’t broken.

Well, turns out something is broken. One side of the tray is holding strong. The other side is definitely not. I realized this when the PVC was in there, but was hoping it wouldn’t be a problem after solving for flex. It’s not moving a massive amount.

After solving for flex…it’s a problem on rough roads. Smooth roads not a huge deal, just causes some chattering. But on rough forest roads I needed to have my InReach in its mount and the charging cable pressed against the dash to hold the pipe from bouncing aggressively.

I still need to pull things back apart, see exactly what I broke, and see what it will take to fix it. I’m afraid it’s a major part of the dash which means replacing with a factory part might be prohibitive.

Yes, this is on me. Also, I absolutely despise clips and think they should go jump in a fire. They weren’t present here, but they’re so prevalent that it’s easy to think they are present.
 
As for the Diode Dynamics fog lights, I finally got around to installing those tonight. Install is relatively easy. Their video is quite well done!


Here’s my additional notes:
  • If you’ve installed the additional covers over the fog lights you’ll obviously need to remove those first. Easy enough, especially if you went with the screws rather than the plugs to hold them on.
  • Get your small hands out for getting to the upper bolts of the factory fog light bracket. They are tucked away and a PITA to get to.
  • Ensure you have the wiring adapters to go from the fog light plug to the factory plug. My kit was missing both, unfortunately, so at this point the fog lights are installed but not plugged in. Connectors have a zip lock bag zip tied around them to protect them until I get can the adapters in.*
  • Once installed (not on, because I haven’t plugged them in yet) they look pretty good, but not great. See the picture below, and the space around the light. Also the fact they aren’t perfectly level with the bezel. Not the end of the world, and definitely doesn’t look bad! But to me it does reveal the price somewhat compared to the more expensive options that replace the bezel.
IMG_0487.jpeg


I’ll post pictures and comments (with the comments being most valuable since capturing accurate pictures of the output will be nigh impossible) once I get the adapters in, the lights plugged in, and have a chance to turn them on at night.

* I’ve already reached out to @Nick@ApolloOptics and will reach out to Diode Dynamics directly if that’s what makes sense. I’m sure it won’t be a big deal to get them.
 
As for the Diode Dynamics fog lights, I finally got around to installing those tonight. Install is relatively easy. Their video is quite well done!


Here’s my additional notes:
  • If you’ve installed the additional covers over the fog lights you’ll obviously need to remove those first. Easy enough, especially if you went with the screws rather than the plugs to hold them on.
  • Get your small hands out for getting to the upper bolts of the factory fog light bracket. They are tucked away and a PITA to get to.
  • Ensure you have the wiring adapters to go from the fog light plug to the factory plug. My kit was missing both, unfortunately, so at this point the fog lights are installed but not plugged in. Connectors have a zip lock bag zip tied around them to protect them until I get can the adapters in.*
  • Once installed (not on, because I haven’t plugged them in yet) they look pretty good, but not great. See the picture below, and the space around the light. Also the fact they aren’t perfectly level with the bezel. Not the end of the world, and definitely doesn’t look bad! But to me it does reveal the price somewhat compared to the more expensive options that replace the bezel.
View attachment 125909

I’ll post pictures and comments (with the comments being most valuable since capturing accurate pictures of the output will be nigh impossible) once I get the adapters in, the lights plugged in, and have a chance to turn them on at night.

* I’ve already reached out to @Nick@ApolloOptics and will reach out to Diode Dynamics directly if that’s what makes sense. I’m sure it won’t be a big deal to get them.
One other thought on this install:

The protective covers have proven invaluable. The electrical connectors, don’t mind everything else, would have been horrible after being exposed quite directly to all of the road grime from the tires.

To add insult to injury, not long after I installed those covers I drove over a freshly tarred road, unfortunately, and picked up some tar on that side. The cover got the tar and everything behind it has nothing.

100% recommend that mod. My install post has links to the exact parts and other thoughts on them.

 
Well crap. Got my tires rotated yesterday. At the end I verbally confirmed the wheel lock key was in the center console, but was focused on my next task and didn’t actually verify it.

Realized today I never got it back. Sitting at the shop now where they’re going to forcefully remove the locks and install regular lug nuts so I’m able to take my own wheels off again should I have a flat and just to do my own servicing in general.

They’re being really good. Got me in immediately, without an appointment, and offered immediately to either order me replacements or to reimburse.

Thankfully, despite the locking nuts being back ordered online my dealer is able to get them in about a week. Going to pick them up at the same time I’m in for my other service work scheduled later this month.

Locking lugs are great, but they really are one more thing to keep track of.
 
I guess I’m not understanding. You went back to the same shop? Where did the key go then?
 
I guess I’m not understanding. You went back to the same shop? Where did the key go then?
Ya, same shop. They have no idea where it went. The person who was working yesterday wasn’t having their best day, and I let the advisor know (politely).

I asked for 50 psi in all 4 tires, they told me they put 50 psi in all 4 tires, they actually put factory pressures.

I have pass-through valve caps, they removed a tire to patch a leak, I got tire back with a standard valve cap.

And then the wheel lock key. :/

First two issues were easily remedied myself. Last one not so much.

This place has been good to me for a while, so I’m just putting it on a bad day for someone.
Sucks for sure, but good for them to make it all better. Personally I have left a key on the nut on my wife’s previous car and went for a shake down drive 😂, found it though after seeking it bouncing down the street in my side view mirror.

Almost did it a second time too. Glad I don’t do this for a living!
Lol!! Nice save! Ya they’re easy buggers to misplace.
 
Got the missing wiring adapters in from Diode Dynamics the other day. Thanks, @Nick@ApolloOptics for working with Diode Dynamics to get them shipped out! Turns out it was a limited packaging issue on Diode Dynamic’s end; no big deal.

I should note they arrived earlier but I was out of the country for a bit there and thus didn’t get them till this week.

As a result, I was able to finally finish installing the fog lights today!

Further emphasizing the not-terribly-custom nature of the install, there are no zip ties provided in the packaging, nor any instructions on how to stow the wires. There’s notably more length than factory. A small thing, to be sure, but still something to have to deal with.

Here’s what I wound up with:

IMG_0602.jpeg


The wires are looped back and zip tied to the factory wire, which is held in place by clips.

Another note: it’s possible to connect the adapter to the factory wire in reverse polarity. Doesn’t appear to have done any damage at all, just meant the light didn’t turn on. Swapped the polarity and the light lit up immediately.

Friendly reminder to test your wiring before buttoning everything up. :)

Went for a drive tonight now that it’s dark, and I’m impressed! Well worth the price I paid for my needs. It wouldn’t surprise me if the Baja Designs setup gives a better pattern and/or more light output, but this is fantastic at 1/4 the price while maintaining a factory look.

First of all, these are immediately and extremely noticeable when you turn them on. Compared to the factory fog lights that’s a huge win already.

Second, for the pattern, they broadcast a very wide angle, illuminating out to 180 degrees (or close enough to) from the front of the truck. It’s pretty impressive, and they have no issues illuminating the ditches or fields off to each side.

Lastly, they blend in well with the factory LED headlights. I happened to nail the angle such that they fill in directly in front of the truck, where the headlights don’t hit all that well, and they don’t cast any light higher than the factory headlights. Additionally, they add a notable amber tint to all of the main lighting, which should make it cut into fog/rain/snow better.

I’ll need to wait for some inclement weather to really test them, but I’m extremely pleased with the performance upon first impression. And the install issues are minor.

With the limited experience I have with them so far, I absolutely recommend this package if you don’t need crazy high performance lighting.
 
Last edited:
Got the missing wiring adapters in from Diode Dynamics the other day. Thanks, @Nick@ApolloOptics for working with Diode Dynamics to get them shipped out! Turns out it was a limited package issue on Diode Dynamic’s end; no big deal.

I should note they arrived earlier but I was out of the country for a bit there and thus didn’t get them till this week.

As a result, I was able to finally finish installing the fog lights today!

Further emphasizing the not-terribly-custom nature of the install, there are no zip ties provided in the packaging, nor any instructions on how to stow the wires. There’s notably more length than factory. A small thing, to be sure, but still something to have to deal with.

Here’s what I wound up with:

View attachment 128009

The wires are looped back and zip tied to the factory wire, which is held in place by clips.

Another note: it’s possible to connect the adapter to the factory wire in reverse polarity. Doesn’t appear to have done any damage at all, just meant the light didn’t turn on. Swapped the polarity and the light kit up immediately.

Friendly reminder to test your wiring before buttoning everything up. :)

Went for a drive tonight now that it’s dark, and I’m impressed! Well worth the price I paid for my needs. It wouldn’t surprise me if the Baja Designs setup gives a better pattern and/or more light output, but this is fantastic at 1/4 the price while maintaining a factory look.

First of all, these are immediately and extremely noticeable when you turn them on. Compared to the factory fog lights that’s a huge win already.

Second, for the pattern, they broadcast a very wide angle, illuminating out to 180 degrees (or close enough to) from the front of the truck. It’s pretty impressive, and they have no issues illuminating the ditches or fields off to each side.

Lastly, they blend in well with the factory LED headlights. I happened to nail the angle such that they fill in directly in front of the truck, where the headlights don’t hit all that well, and they don’t cast any light higher than the factory headlights. Additionally, they add a notable amber tint to all of the main lighting, which should make it cut into fog/rain/snow better.

I’ll need to wait for some inclement weather to really test them, but I’m extremely pleased with the performance upon first impression. And the install issues are minor.

With the limited experience I have with them so far, I absolutely recommend this package if you don’t need crazy high performance lighting.
Glad you are happy with them @ccw !!
 
Got the missing wiring adapters in from Diode Dynamics the other day. Thanks, @Nick@ApolloOptics for working with Diode Dynamics to get them shipped out! Turns out it was a limited packaging issue on Diode Dynamic’s end; no big deal.

I should note they arrived earlier but I was out of the country for a bit there and thus didn’t get them till this week.

As a result, I was able to finally finish installing the fog lights today!

Further emphasizing the not-terribly-custom nature of the install, there are no zip ties provided in the packaging, nor any instructions on how to stow the wires. There’s notably more length than factory. A small thing, to be sure, but still something to have to deal with.

Here’s what I wound up with:

View attachment 128009

The wires are looped back and zip tied to the factory wire, which is held in place by clips.

Another note: it’s possible to connect the adapter to the factory wire in reverse polarity. Doesn’t appear to have done any damage at all, just meant the light didn’t turn on. Swapped the polarity and the light lit up immediately.

Friendly reminder to test your wiring before buttoning everything up. :)

Went for a drive tonight now that it’s dark, and I’m impressed! Well worth the price I paid for my needs. It wouldn’t surprise me if the Baja Designs setup gives a better pattern and/or more light output, but this is fantastic at 1/4 the price while maintaining a factory look.

First of all, these are immediately and extremely noticeable when you turn them on. Compared to the factory fog lights that’s a huge win already.

Second, for the pattern, they broadcast a very wide angle, illuminating out to 180 degrees (or close enough to) from the front of the truck. It’s pretty impressive, and they have no issues illuminating the ditches or fields off to each side.

Lastly, they blend in well with the factory LED headlights. I happened to nail the angle such that they fill in directly in front of the truck, where the headlights don’t hit all that well, and they don’t cast any light higher than the factory headlights. Additionally, they add a notable amber tint to all of the main lighting, which should make it cut into fog/rain/snow better.

I’ll need to wait for some inclement weather to really test them, but I’m extremely pleased with the performance upon first impression. And the install issues are minor.

With the limited experience I have with them so far, I absolutely recommend this package if you don’t need crazy high performance lighting.
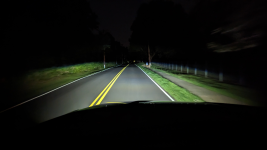
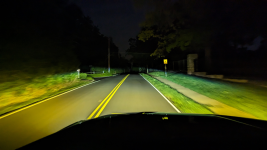
FWIW I did try taking some pictures of the light output last night. Take these with a grain of salt, as capturing accurate pictures of light output seems nigh impossible.

I hope it’s obvious which picture has the fog lights on. :)

IMG_0605.jpeg
IMG_0604.jpeg
 
That’s awesome! Thanks for the tip!

Have you had a chance to have them on at night with your low beams? If so, are they bright enough to actually contribute? Any other thoughts on them when in action?
I have em too. They're WAY better than the OEM fogs...which are really just accent lights at best. The low beams kinda drown out the color straight ahead. They throw really wide tho, so they fill in everything under and to the sides as you'd expect.

Pics snapped from my truck. Pardon the crappiness.

1692806023721.png1692806148485.png
 
Back
Top