Project Shadowfax

Wanted to get some better pictures of the new fog lights, especially with the knowledge of being able to turn them on with only the parking lights. Drove out a dirt road tonight and got the following. Note that I have not enabled Bambi mode on my truck, and have no intention of doing so, so there is no picture of the high beams and fog lights at the same time.

In horribly inclement weather the winning move is absolutely to run parking lights and fog lights, no headlights. They'll be perfect for that. Should result in minimal reflection, and solid illumination of the road immediately ahead and beside. They'll prove marginally useful in moderately inclement weather as you'll need low beams on. Those low beams will be doing most of the work. Outside of that the fog lights serve no purpose and should remain off.

This is exactly how fog lights should function, in my mind. They're there for fog (or other weather that severely limits vision), not general driving.

All images labelled with "Straight Ahead" were taken looking straight ahead using an iPhone 12 Mini, 0.5x camera.
All pictures labelled "Left Side" were taken looking over the left, front fender from inside the truck using an iPhone 12 Mini, 1x camera.

[Straight Ahead] Fog lights and parking lights.
View attachment 128710

[Straight Ahead] Fog lights and low beams.
View attachment 128711

[Straight Ahead] Low beams only.
View attachment 128712

[Straight Ahead] High beams only.
View attachment 128713

[Left Side] Fog lights and parking lights.
View attachment 128717

[Left Side] Fog lights and low beams.
View attachment 128716

[Left Side] Low beams only.
View attachment 128715

[Left Side] High beams only.
View attachment 128714
Great pics!!
 
  • Love
Reactions: ccw
While I was outside and intending to play with ForScan, I went ahead and enabled the toggle for silent mode. Huge thanks to @Rock Taxi for their post over in the ForScan section!


I've also documented this in my modifications post on page 1 of this thread.

For anyone unfamiliar, here's what the info bubble says about the toggle:

I want this toggle available in particular for when I'm camping, but I could see it being useful other times. I may experiment with keeping it enabled by default.

I was particularly burned by this on an overnight search and rescue mission. We had a camping area away from the main command post so it could be dark and quiet while people tried to get a bit of shut eye. On my way to get some sleep, I rolled in with only my parking lights on to minimize my impact. Parked myself, opened my door and...the truck lights up the world. Felt terrible, and the lights couldn't shut off fast enough.
I am so happy with the customization that Forscan offers. I too enabled the toggle and it is great for all sorts of situations. Really makes you wonder why Ford doesn’t have a number of these optioned enabled from factory.
 
  • Winner
Reactions: ccw
I am so happy with the customization that Forscan offers. I too enabled the toggle and it is great for all sorts of situations. Really makes you wonder why Ford doesn’t have a number of these optioned enabled from factory.
Seriously! I can see the defaults they’ve chosen and they make sense (generally). I also understand not wanting to add a setting for every single little thing.

But something like silent mode? Where they’ve already implemented the toggle in the UI and it’s ready to go? Bit strange they don’t just expose it.
 
It’s happening…

IMG_0676.webp
 
Oh man! What are we doing?
Primary thing is installing radios:
  • Commercial VHF (for SAR)
  • Ham
  • CB
The radios install is what necessitated removing the center console, to run wiring and mount handsets. Radio bodies will be under the back seat.

Secondary things:
  • Try to fix the clip I broke when I installed the BuiltRight mount above the center stack. It's causing the pipe attached to the mount to wobble.
  • Shorten the pipe to get it further away from the windshield.
  • Paint the pipe matte black.
  • Swap the traction control button and camera/lane departure buttons so the camera button is closer to the driver. Existing thread linked below.
  • Wire the USB/cigarette lighter power block I put on top of the dash on the BuiltRight mount. Want to wire it into the power port on the front of the dash.
 
Primary thing is installing radios:
  • Commercial VHF (for SAR)
  • Ham
  • CB
The radios install is what necessitated removing the center console, to run wiring and mount handsets. Radio bodies will be under the back seat.

Secondary things:
  • Try to fix the clip I broke when I installed the BuiltRight mount above the center stack. It's causing the pipe attached to the mount to wobble.
  • Shorten the pipe to get it further away from the windshield.
  • Paint the pipe matte black.
  • Swap the traction control button and camera/lane departure buttons so the camera button is closer to the driver. Existing thread linked below.
  • Wire the USB/cigarette lighter power block I put on top of the dash on the BuiltRight mount. Want to wire it into the power port on the front of the dash.
Very cool, detailed write up would be amazing for the radio(s) install. I am just about to start a ham study course with the intention to write the exam at the end.
 
Very cool, detailed write up would be amazing for the radio(s) install. I am just about to start a ham study course with the intention to write the exam at the end.
Glad to hear you're going after your license! Good luck with studying and the exam! Also, welcome to another money pit. ;)

From an electrical standpoint, my install is notably more complicated than a standard radio install. I have a thread dedicated to the electrical planning for my truck:


Otherwise the most difficult part of this whole thing has been figuring out where to put everything in the cab! One thing I settled on (eventually) is command-mic style radios only for my truck to reduce how much I need to wire/mount. That's where the entire radio can be controlled from the mic, including the mic having a display.

The radios I'm using:
For the Ham radio, I chose the PRO variant so that it can be used as a secondary SAR radio, as it's part 90 certified. That's assuming it passes our spectrum analysis to ensure its harmonics are compliant.

(It can be switched between amateur and professional modes with the programming software; professional mode locks out a number of features to be compliant, whereas amateur mode restricts the frequencies you can transmit on to only the ham bands.)

The 578 wouldn't be my first recommendation for a mobile radio unless you need the command mic. As far as I'm aware after hours of research, it's the only amateur radio on the market that supports that.

The programming software leaves much to be desired, the manual isn't great, there's some really odd button and configuration decisions, etc.

For a basic dual band mobile ham radio I far prefer what I had in my old truck: Icom IC_2730a. If I needed digital and/or APRS capabilities, personally I would be looking at other radios.
 
Where is our updated hand drawn layout/diagram of this project?? Don’t be slacking on us!
 
  • Haha
Reactions: ccw
Where is our updated hand drawn layout/diagram of this project?? Don’t be slacking on us!
Lol! When it comes to exact cable routing and mounting I'm kind of making it up as I go! I can draw out what wires are supposed to connect to where, but actually routing them requires seeing the guts of the truck.
 
Lol! When it comes to exact cable routing and mounting I'm kind of making it up as I go! I can draw out what wires are supposed to connect to where, but actually routing them requires seeing the guts of the truck.
Well, not that I ever understand your awesome drawings, I was a bit surprised to not see one when referencing a current truck upgrade project. That’s usually the opening post! Like a table of contents! Oh well, carry on!
 
Well, not that I ever understand your awesome drawings, I was a bit surprised to not see one when referencing a current truck upgrade project. That’s usually the opening post! Like a table of contents! Oh well, carry on!
Oh gotcha! I would say my electrical planning thread, linked above and again below, is the source of the diagrams you would be looking for! What I'm doing now is all tied up in that.

 
Progress is happening! Full post will come when it’s done, but many internet points to who can guess where this funky piece is going:

IMG_0682.jpeg


(No, this piece isn’t finished. I still have cleanup to do and I’ll paint it matte black. The shape is complete, though. Also I’m definitely not a professional metalworker.)

My two hints:
  • The center console is still out.
  • I’ll be putting the mic connectors (two bulkhead Ethernet pass throughs and the F7510’s proprietary connector) in the middle of it.
 
Last edited:
Progress is happening! Full post will come when it’s done, but many internet points to who can guess where this funky piece is going:

View attachment 131096

(No, this piece isn’t finished. I still have cleanup to do and I’ll paint it matte black. The shape is complete, though. Also I’m definitely not a professional metalworker.)

My two hints:
  • The center console is still out.
  • I’ll be putting the mic connectors (two bulkhead Ethernet pass throughs and the F7510’s proprietary connector) in the middle of it.
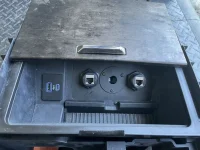
Ok, update time. Here’s where that piece wound up and what its for:

IMG_0683.webp

Goodbye wireless charger that I never use, hello radio mic connectors!

Still need to reinstall the console in the truck and connect the wires to the plate, but it’s made and in the console!


Here’s the backside of it:
IMG_0684.webp


The center hole is for the F7510 proprietary connector. The Ethernet ports are bulkhead pass throughs I got at a local electronics store.
 

Attachments

  • IMG_0683.webp
    IMG_0683.webp
    229.6 KB · Views: 47
This weekend a new toy showed up for Shadowfax: Weigh Safe hitch! Purchased through none other than @Nick@ApolloOptics here on the forum, of course. :D

View attachment 51683

I've been doing some miscellaneous towing recently and had to borrow a hitch from a friend, so I knew I needed to get a permanent solution for Shadowfax. Here's what I went with:
  • Weigh Safe 2.5" shank
  • 8" drop
  • Steel - purely to be able to run the pintle adapter. I would have far preferred the weight savings of aluminum, but the pintle adapter isn't compatible.
  • All three ball sizes: 2 5/16", 2", and 1 7/8".
  • Pintle adapter.
  • Keyed-alike locking pins.
This thing is a beast. It weighs an absolute ton, but seems extremely well built.

So I have somewhere to store it, I've now ordered a Pelican case with custom foam. That will keep all the bits together. Specifically I've ordered the 1550 protector case.

View attachment 51687

View attachment 51686

The custom foam site is really cool, though a bit tedious. Probably took me an hour to get everything dialed in. Also pro-tip: purchase the case on the main Pelican site, not with the foam. If you purchase it with the foam it skyrockets the shipping cost, but on the main site shipping for the case is free.

Links:
Edit: Follow-up post with the final result:

https://www.fordtremor.com/threads/project-shadowfax.6005/post-219670


Did you happen to see this? I got it for my hitch, can’t beat $35. Pretty thoughtful of them to come out out with a relatively cheap and convenient product like this for their hitches.

 
Did you happen to see this? I got it for my hitch, can’t beat $35. Pretty thoughtful of them to come out out with a relatively cheap and convenient product like this for their hitches.

I did! I was actually given a heads up they were producing a case - though they didn’t tell me any details - as I emailed them pictures of my setup.

If it fits your needs it’s pretty tough to beat it. Great to see them come out with it.

Unfortunately that wouldn’t have fit my needs. First, it’s only rated for the aluminum hitches. I have to imagine this relates to the weight of the steel components and the strength of the case (likely the latches). Second, it doesn’t support all the ball sizes as separate balls; it supports them using an adapter thing and I have 3 separate balls. Third and last, it doesn’t support the pintle hitch.

(Not supporting the pintle hitch makes a ton of sense since it was only supported by the steel hitches, which the case doesn’t support, and the pintle hitch is no longer sold.)
 
I did! I was actually given a heads up they were producing a case - though they didn’t tell me any details - as I emailed them pictures of my setup.

If it fits your needs it’s pretty tough to beat it. Great to see them come out with it.

Unfortunately that wouldn’t have fit my needs. First, it’s only rated for the aluminum hitches. I have to imagine this relates to the weight of the steel components and the strength of the case (likely the latches). Second, it doesn’t support all the ball sizes as separate balls; it supports them using an adapter thing and I have 3 separate balls. Third and last, it doesn’t support the pintle hitch.

(Not supporting the pintle hitch makes a ton of sense since it was only supported by the steel hitches, which the case doesn’t support, and the pintle hitch is no longer sold.)

Yep, for me it’s perfect, simple inexpensive small, will keep it stored away nicely when not in use. For your particular needs it’s hard to beat the custom setup you designed.
 
  • Winner
Reactions: ccw
Yep, for me it’s perfect, simple inexpensive small, will keep it stored away nicely when not in use. For your particular needs it’s hard to beat the custom setup you designed.
Same here... Works great for my setup. Of course I now have case envy after @ccw finished his work of art 🎨 💼 ;)
 
  • Winner
Reactions: ccw
Shadowfax went into the dealer today for what may be the last fix on the bumper to bumper warranty. Have less than 2000 miles left until I hit 36k, so it’s likely I’ll go over by the end of the year.

Specifically wanted to have SSM 51741 addressed. That’s the software update to fix the heated/ventilated seats not turning on when the truck is remote started.

Conveniently, that required a bunch of other module updates so the truck is much more up to date than it was previously.

All of the modules updated:
  • DDM
  • PDM
  • PCM
  • HVAC
  • BCM
  • WCAM
  • APIM
 
Between yesterday and today, Shadowfax got 3 new Gatorback mud flaps in gunmetal! First picture shows the factory flap on the front, second the new flap. Third picture shows the rear.

View attachment 53679
View attachment 53676
View attachment 53678

Why only three you may ask? Well, turns out I have some leftover damage from the deer hit in the form of some bent metal on the drivers side. That prevented a bracket from fitting properly. Once that's fixed I'll install the last flap, but in the meantime I've reinstalled the factory flap so I'm still legal.

Thread where that was discovered is here:


And you can follow along for updates on the fix if you want here:


As for the mud flaps: I love the look and quality of them. Gunmetal is the perfect color for the blackout package IMO. They are also heavy duty and premium. Admittedly, they should be for the price! Only reason I went with them is to spend Ford Pass Points I had earned through servicing my old truck and the purchase of the new truck. I'm excited to see how they hold up over time.

Some notes on the install:
  • Here's the install videos:
    • Front:
    • Rear:
  • Be sure to utilize both the install videos and the written instructions. I found I was mostly using the videos, but there were a few key steps where the written instructions clarified things.
  • Pay careful attention to whether their instructions are for a truck with or without flares and with or without liners. One time I didn't notice they had swapped back to talking about trucks without flares and went down a rabbit hole.
  • Front install was relatively straightforward, just a decent number of steps. Only thing that was confusing is the sheet metal screws you're provided to attach the flap itself to the bracket come in two sizes: short (one per side) and long (3 per side). None of the instructions clarified where the short screw goes. Quick call to the company sorted that out. Short screw goes in the only hole that doesn't have the strip washer in front of it.
  • Rear install is a bit of a bear if you have the OEM liners (and possibly third party liners?), excluding my bent sheet metal.
    • The retainer pins holding the liner in place are large and suck. I totally mangled one, and the others definitely saw some damage. In another thread it was worked out that the part number for those pins is: W715272-S300
    • In the video they imply you can easily bend the liner out of the way to get access to things behind. Perhaps this was true in previous model years, but with my truck the liners are stiff and pretty well locked into place. I could barely get the lower expansion nut out where you have the most flexibility, but then they want you to remove a bolt higher up. Plain and simple: there was no way I was going to fit a ratchet, socket, and unthreaded bolt up there. And a standard wrench would have taken forever.
    • After some fighting with things, then humming and hawing I figured out a workaround. Ultimately they want you to drill a hole through the liner. Their steps have you remove that upper bolt so you can stick a pick/awl through the bolt hole and punch a pilot hole through the liner. Instead, I stuffed a small right-angle pick up against the face of the bolt and pushed my pilot hole through. From there I was able to hold the liner out far enough to drill my larger hole with a stepped drill bit. Drilled it large enough to squeeze my 10mm socket through and get to the bolt so I could remove it. The larger hole isn't a problem as it's covered entirely by the front bracket, short of a bolt going through it.
    • The curved piece of metal that the rubber flap directly attaches to was curved too much, and wouldn't fit between the flare and fender flange without putting a ton of pressure on the bottom of the flare. I un-curved it over my knee a few times so it fit dramatically better.
Parts list:
Hi CCW, I'm considering the Gatorback mudflaps on my new SD Tremor. The other option is probably just the Ford OEM flaps. Are you still liking the Gatorbacks after a full winter on ShadowFox?

I'm not planning on 37's any time soon, but I'm curious if you think you could run 37's with them.

Also curious if you think they might get hung up on rocks or debris if traveling over some rough stuff. Or if chains mounted on 35's might tear up the mudflaps.

Seems like a lot of work to install those flaps - but they do seem like a superior product compared to the OEM mudflaps. . My dealer said they would install them if I so desired (at their standard hourly labor rate).
 
Back
Top Bottom