-
Featured
- #221
Navigation
Install the app
How to install the app on iOS
Follow along with the video below to see how to install our site as a web app on your home screen.
Note: This feature may not be available in some browsers.
More options
Style variation
You are using an out of date browser. It may not display this or other websites correctly.
You should upgrade or use an alternative browser.
You should upgrade or use an alternative browser.
Upfitter Wiring Harness Discussion
- OP 🔹 Cblaxx19
- Start date

I would be in for round two but need longer lengths on grounds and pigtails for my liking.
Can you show us the rest of it? What year truck and model?I put mine on the fire wall lug View attachment 156964
24 platinum I’ll post more pix when I canCan you show us the rest of it? What year truck and model?


- Feb 21, 2024
- 858
- 1,641
- USMC
- 24 F250 Platinum H.O.
- 2015 VW Jetta TDi, 2018 CVO Street Glide
Waiting for pictures to see how it turned out. I have one that might be for sale if the leads or anything isn't long enough.24 platinum I’ll post more pix when I can

DTX2023Tremor
Bourbon & Tremor Enthusiast
Tremor of the Month 🏆
Founding Member 📜
Meetup Organizer 🚧
GB Coordinator 📢
Trail Captain 🧭



I'm not going to install the set I have if someone is interested in buying it from me. My shop had already wired everything up to the upfitters and felt it unnecessary to unwire it to put the harness in and reconnect it all together. It would have made sense for me if these were added before things were connected.
In any case, PM me if you're interested. $150 with shipping included
In any case, PM me if you're interested. $150 with shipping included

I’m not going to install mine either
- OP 🔹
- #228
Sorry i have been away for a little bit. i don't seem to get consistent emails when there is activity on this thread.View attachment 156923View attachment 156924View attachment 156925
2023 F250 Tremor. Here’s my first attempt with mocking it up to see how it will fit. Easily got to the upfitter wires. Attaching the wires to the harness will not be tough, pretty straight forward.
I assume this harness is meant
To fit between the upfitter box and the engine or straight down behind the wheel well. There are other wire runs that will keep it off the engine if you go that route.
Now for the hard part. Where to ground it to the body. Ground leads are too short. The harness ground end needs to be about two feet longer. This would give you more flexibility.
My idea as of now is to lengthen the ground lead by bolting another wire, probably 6 gauge, to the connector and cover it with heat shrink. Drop it straight done the wheel well to a ground on the frame. Should be last picture.
Thoughts?
Relative to the grounding, can the ground lead not make it to the negative battery terminal? after a few discussions in this thread, the negative terminal was deemed acceptable to use as a grounding point. at least that's what i interpreted from the discussions.
as a side note, you could choose to not use the ground leg if it doesn't reach a point you desire as a ground location. you could just utilize the positive legs of the pigtails and take the accessory ground to a location of your choice(closest body ground to the accessory).
Future harnesses can definitely add length to both the connection pigtails and the ground leg. I actually added length to the connection pigtails between sample harness and final units because i didn't feel the connections could sperate enough from each other.
i welcome any and all feedback.
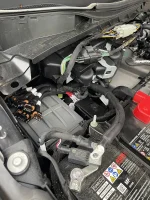
I think the negative battery terminal maybe the best option. Here is the harness how I saw the best fit. Negative terminal to the battery, upfitter conections run down and behind upfitter box. They should be easy to connect when you pull out the box. Connectors are free to move to get in the fuse box if needed.
Now you can either run the accessory negative lead to the harness or ground it to the body at the accessory location if needed.
Now you can either run the accessory negative lead to the harness or ground it to the body at the accessory location if needed.
Attachments
Sent you a message.I'm not going to install the set I have if someone is interested in buying it from me. My shop had already wired everything up to the upfitters and felt it unnecessary to unwire it to put the harness in and reconnect it all together. It would have made sense for me if these were added before things were connected.
In any case, PM me if you're interested. $150 with shipping included
I woulld like to get in on the next order, adding myself to the list.

I'm on the list

- Jul 29, 2023
- 4,026
- 11,705
- 2023 F350 XLT Premium Tremor, SAP, 7.3L
- 2023 F150 XLT Lightning, Extended range, 312A, Tow Tech/ Max Tow
Started wiring this up today. Only hard part so far was finding the stupid wires that Ford hides lol!
Kit seems awesome and though I only did one wire (only had one piece of shrink tubing in my toolbox for whatever reason) it was simple.
I’ve never used the solder on shrink connections before so I hope the solder melted enough?? I was using a Milwaukee heat gun and hit it pretty good but i can’t really tell….
I’ll get some more shrink tubing this afternoon and finish this up tomorrow morning.
- Jul 29, 2023
- 4,026
- 11,705
- 2023 F350 XLT Premium Tremor, SAP, 7.3L
- 2023 F150 XLT Lightning, Extended range, 312A, Tow Tech/ Max Tow
Alright finished it up this morning!
My thoughts, extremely well made and almost essential to be able to use your upfitters properly. When I did mine I pulled the fuse box loose so I could more easily access the wires, It definitely made the job easier.
I opted to only connect 1-6 and left the other 4 wires not connected. I think I would have preferred it to have them in my bundle but I guess choices never hurt.
The only thing I didn’t like, and I mentioned it above is the heat shrink solder thing…. Tbh I’m still not sure they’re right? I didn’t see them melt and having never used them before I’m not sure what they’re supposed to do or look like. I used a lighter today to get them as hot as so dared and than a heat gun to shrink the tubing. I let each one cool and than slid a 3” piece of heat shrink over that and hit that with the heat gun and sealed it all up. When all 6 wires were done I wrapped the whole bundle in electric tape to reduce any risks of pulling apart.
Bundle tucks in nicely behind my battery above the fuse box, tons of room there.
I also remembered a lot of talk about grounding and some folks getting pretty anxious about it. My truck has a grounding bolt right beside the battery. It’s a 5/16” long headed bolt. I pulled it slipped a washer on and righted the ground down really well. I can’t foresee any issues and the grounding cable is more than long enough.
So basically as long as those heat shrink solder connections work as prescribed i think I’m good to start installing the pile of lights so have laying in the garage.
- OP 🔹
- #235
for the solder shrinks, typically you can see the solder wick along the wire strands once it melts. if you tried to pull the wires apart at all, and couldn't, then you should be good to go and the solder did its thing. I have had a few instances where the solder did melt and wick, but I couldn't really see it due to the way i was holding the wires together and the heatgun.View attachment 161106
View attachment 161107
Alright finished it up this morning!
My thoughts, extremely well made and almost essential to be able to use your upfitters properly. When I did mine I pulled the fuse box loose so I could more easily access the wires, It definitely made the job easier.
I opted to only connect 1-6 and left the other 4 wires not connected. I think I would have preferred it to have them in my bundle but I guess choices never hurt.
The only thing I didn’t like, and I mentioned it above is the heat shrink solder thing…. Tbh I’m still not sure they’re right? I didn’t see them melt and having never used them before I’m not sure what they’re supposed to do or look like. I used a lighter today to get them as hot as so dared and than a heat gun to shrink the tubing. I let each one cool and than slid a 3” piece of heat shrink over that and hit that with the heat gun and sealed it all up. When all 6 wires were done I wrapped the whole bundle in electric tape to reduce any risks of pulling apart.
Bundle tucks in nicely behind my battery above the fuse box, tons of room there.
I also remembered a lot of talk about grounding and some folks getting pretty anxious about it. My truck has a grounding bolt right beside the battery. It’s a 5/16” long headed bolt. I pulled it slipped a washer on and righted the ground down really well. I can’t foresee any issues and the grounding cable is more than long enough.
So basically as long as those heat shrink solder connections work as prescribed i think I’m good to start installing the pile of lights so have laying in the garage.
- Jul 29, 2023
- 4,026
- 11,705
- 2023 F350 XLT Premium Tremor, SAP, 7.3L
- 2023 F150 XLT Lightning, Extended range, 312A, Tow Tech/ Max Tow
I put a considerable amount of heat with a lighter and heat gun to them all.. i honestly didn’t tug on them. Just not a tool I’m used to using. I’ve soldered 100’s of connections and certainly used my share of crimp on butt connectors…. This is just a new one for me, I’m sure it’s better than the old way but you know what they say about an old dog?for the solder shrinks, typically you can see the solder wick along the wire strands once it melts. if you tried to pull the wires apart at all, and couldn't, then you should be good to go and the solder did its thing. I have had a few instances where the solder did melt and wick, but I couldn't really see it due to the way i was holding the wires together and the heatgun.
- Jul 29, 2023
- 4,026
- 11,705
- 2023 F350 XLT Premium Tremor, SAP, 7.3L
- 2023 F150 XLT Lightning, Extended range, 312A, Tow Tech/ Max Tow
Follow up…. Went to close my hood today.. fortunately I am not one to slam things, the cable here hits the support strut on the hood so now I have to rethink this a little bit….


Will it clear if you bend the ground lug to a 45º or a 90º?View attachment 161464
Follow up…. Went to close my hood today.. fortunately I am not one to slam things, the cable here hits the support strut on the hood so now I have to rethink this a little bit….
- Jul 29, 2023
- 4,026
- 11,705
- 2023 F350 XLT Premium Tremor, SAP, 7.3L
- 2023 F150 XLT Lightning, Extended range, 312A, Tow Tech/ Max Tow
No place to bend it…. The body of the truck is in the way if bending the cable and the lug itself is just a tall bolt head. Bending it wouldn’t change where the cable anchors…Will it clear if you bend the ground lug to a 45º or a 90º?
Last edited:
Perhaps you can extend the ground point with a small length of flat stock, to create a bus bar, then you will be in the clear of the strut. Flat stock with two drilled holes and one bolt and nut needed.No place to bend it…. The body of the truck is in the way if bending the cable and the log itself is just a tall bolt head. Bending it wouldn’t change where the cable anchors…