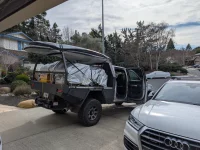

Rossmonster Truck Build – 2024 F350 (long wheelbase)

Finally upgraded to the Carli Torsion Sway Bar. After being "bounced around" once too often :ROFLMAO::ROFLMAO::cool: off-road I decided it is time. Can't wait to hit the road again in a week or two and test it. Until then I just admire the "shiny bling"

View attachment 200015
View attachment 200016
View attachment 200017
Im excited to hear your thoughts.

We love ours. Once we got our shocks re'valved near XXHD, the truck is unstoppable. Easily did 65mph during out time in baja offroad. Magic Carpet all day.

Assuming people match the revalving to their truck/camper weight, we almost always recommend ordering it.
 
Finally upgraded to the Carli Torsion Sway Bar. After being "bounced around" once too often :ROFLMAO::ROFLMAO::cool: off-road I decided it is time. Can't wait to hit the road again in a week or two and test it. Until then I just admire the "shiny bling"

View attachment 200015
View attachment 200016
View attachment 200017
View attachment 200018
I'll be curious to hear your opinion on it after some on and off road miles. Do you have a rear sway bar? Do you know your front and rear loaded weights?

Unfortunately my truck is only having hauling duties lately as I slowly move all my crap to storage in our new hometown.
 

Attachments

  • PXL_20250227_230339467.webp
    PXL_20250227_230339467.webp
    370.5 KB · Views: 82
I'll let you know once I have a few miles under my belt with it. I need to get on a Catscale somewhere and get the weight per axle. I do not have a rear sway bay and I doubt I will need it. The upgraded leaf springs are doing a fantastic job. I may have Deaver add one additional leaf, but that is TBD.
 
Ya I just retightned mine last night after 5k. Loose!
I have touched on topic heavily and still most don't see the importance of going under their rigs to ensure everything is torqued to spec.

For me, this is the norm and part of the monthly maitenance routine.
 
Ya I just retightned mine last night after 5k. Loose!
Are you just tightening the top and bottom nut, or actually having to tighten the cap that attaches to the end link body
 
I have touched on topic heavily and still most don't see the importance of going under their rigs to ensure everything is torqued to spec.

For me, this is the norm and part of the monthly maitenance routine.
Yes, so important!!!!!!
 
Are you just tightening the top and bottom nut, or actually having to tighten the cap that attaches to the end link body
I loosen the top and bottom nut, and tighten the cap on both ends, then retighten the top and bottom nuts. If you have more questions shoot me a DM so we dont hijack Mr @Chris-DTA thread!!
 
Made some minor improvements to the inside of the camper this past weekend. Installed red LED lights above the cabinets just in time for bug season. Ideally, this will help with attracting fewer bugs and mosquitoes. It should also be beneficial when stepping outside into the darkness and adjust quicker to low-light or no-light situations.

I decided against connecting directly to the camper's 12V system and instead installed a 120V-to-12V transformer and an external 12V switch panel (4 switches). This allows me better control and to turn the system off when not needed to reduce battery draw. I will re-do the wiring later on as I wasn't sure initially if I would like this mode, but for this season it should do the trick. And I have a few more things on my mind to utilize the switches and power.

To make it all round, I also replaced one of the reading lights over the bed area with one that has a stronger neck, but also has a red light function.

PXL_20250428_025906070.webp

PXL_20250428_025944539.webp

PXL_20250428_025937689.webp

PXL_20250425_210137927.webp

PXL_20250425_210057900.webp

PXL_20250425_210118885.webp
 
Made some minor improvements to the inside of the camper this past weekend. Installed red LED lights above the cabinets just in time for bug season. Ideally, this will help with attracting fewer bugs and mosquitoes. It should also be beneficial when stepping outside into the darkness and adjust quicker to low-light or no-light situations.

I decided against connecting directly to the camper's 12V system and instead installed a 120V-to-12V transformer and an external 12V switch panel (4 switches). This allows me better control and to turn the system off when not needed to reduce battery draw. I will re-do the wiring later on as I wasn't sure initially if I would like this mode, but for this season it should do the trick. And I have a few more things on my mind to utilize the switches and power.

To make it all round, I also replaced one of the reading lights over the bed area with one that has a stronger neck, but also has a red light function.

View attachment 208494
View attachment 208495
View attachment 208496
View attachment 208497
View attachment 208502
View attachment 208503
looks good.

What 120>12 inverter did you go with?
 
looks good.

What 120>12 inverter did you go with?
This one from Amazon.

"LED Driver 150 Watts Waterproof IP67 AC 110-260V to 12V 12.5A Low Voltage Transformer Outdoor Ultra Thin Power Supply Adapter for LED Strip,Landscape Lighting Project, and Any 12V LED Lights"​


@Chris-DTA, Curious the thought process of using a 120V-to-12V transformer and an external 12V switch panel (4 switches) rather than adding another 12v circuit with the same 12v switch panel. With the switch panel or any type of isolating 12v switch, you could still isolate the new light circuits from your 12v system when needed. Plus, you wouldn't have to have your 120v inverter on just to power these lights if you didn't have the need for any other 120v load (no need to leave inverter on all night if you wanted to be able to use these lights in the middle of the night). And, you'd avoid the efficiency losses of converting/inverting from 12v to 120v and back to 12v.
 
@Chris-DTA, Curious the thought process of using a 120V-to-12V transformer and an external 12V switch panel (4 switches) rather than adding another 12v circuit with the same 12v switch panel. With the switch panel or any type of isolating 12v switch, you could still isolate the new light circuits from your 12v system when needed. Plus, you wouldn't have to have your 120v inverter on just to power these lights if you didn't have the need for any other 120v load (no need to leave inverter on all night if you wanted to be able to use these lights in the middle of the night). And, you'd avoid the efficiency losses of converting/inverting from 12v to 120v and back to 12v.
I hear ya :) . Definitely, not the most efficient way from a power conversion perspective.

Some things in the Rossmonster I can easily get to, others not so much. I probably could have connected these lights to the 12V system inside the passenger dinette rear bench and feed the wires up, but one challenge as an example is the raising roof mechanism and where any type of wires/cables are routed "upstairs". It's not as open and easily accessible as in the Supertramp you have. Here in the Rossmonster, I already installed a Victron Multi Controller GX and fed a Cat 6 cable "upstairs" and dealt with the "complexity" a bit. I also cannot get behind the upper cabinets to route wires or follow where RM does it (ceiling) without major hassle. In this case, I decided on the easy way out and kept it simple. I am planning to visit Rossmonster later in Fall for some upgrades and may include this and even have the lights connected to the FireFly control unit (tbd), but for now this does the trick.
 
A few weeks ago I joined two fellow Tremor forum members (@gmoon @gunzfcc) on a fun adventure traveling parts of the Mojave Road. It was a fun weekend trip. Impressions of this trip are now up on my YouTube Channel in case you are "into this kinda stuff" :cool: . PS: Some of the footage/pictures were taken by gmoon/gunzfcc which I really appreciated.

 
Looks like a great trip Chris!

I was off to Death Valley last week with some high school friends. My truck, a Ranger with Alucab, and the Toyota trio (80 series LC, 4Runner, Tacoma). Started off in Trona Pinnacles (where I had to plug a flat tire :(), then up and over the Escape Trail to Goler Canyon & Mengal Pass to our camp for a couple nights in Striped Butte Valley. From there we camped up a couple different canyons off of the West Side Road. One of them had a nice flowing spring which was a pleasant surprise. We finished off with a couple nights camped up Marble Canyon. We then went our separate ways and I spent the last night camped on the Kern River. The truck did well with what was probably the most technical trail I've done on it yet (first full day into Striped Butte Valley). Biggest issue is just keeping check on the off-camber stuff. It was great to get out for a while, connect with old friends, and get away from the stress of selling our house (which is now FINALLY in escrow!).

IMG_0245.webp

PXL_20250429_154744201.webp


PXL_20250426_221912257.webp


PXL_20250425_195715609~2.webp


PXL_20250424_184408078.webp


PXL_20250424_183847946.webp


PXL_20250424_003056151~2.webp


PXL_20250423_234912066.webp


IMG_8407.webp

PXL_20250430_215643856.PANO.webp
 
New video is up if you are interested. The Good and the Bad about my Rossmonster Baja. In this video I go into a lot of build details about what I like and dislike about the Baja. I hope you enjoy it.

 
So, this may be "controversial", but I am doing it anyway. I do have the Carli Pintop 2.5/3.5 suspension + the progressive XXHD (3,500 LBS) Carli leaf springs (made by Deaver) on my rig. While the ride quality overall is good and feels sufficient, on a few occasions, I felt it may be better to add one additional leaf to the spring pack.

I did put the truck on a scale, and the numbers don't lie - the 3,500 LBS leaf spring is "undersized" for the weight, not dramatically, but enough that it makes sense to add a leaf to the setup. When I travel, I travel heavy often and upgrading the suspension will go long ways down the road. I talked to Deaver about it and also checked with Dan at Carli just to make sure I am not missing anything important. Sure, Deaver can make a full new, custom leaf spring pack specifically for my truck, but at the moment, I do not want to spend that kind of money. Adding a single leaf should be sufficient to address this situation.

Deaver has a full calendar, so it will be a few weeks until it is my turn, but I am looking forward to this.
Do you have bags on there Chris? These Logiq bags I just installed have changed my life!
 
Do you have bags on there Chris? These Logiq bags I just installed have changed my life!
No bags in my case. I think the full-travel bags from Carli are the only ones that would work with the suspension (but I could be wrong). I saw your posting about the Logiq bags. Very interesting topic.
 
Back
Top Bottom