Project Shadowfax

Pelican case for my Weigh Safe hitch is fully assembled. And it. Is. Awesome.

Case weighs 57 pounds with everything in it. This is the reason I went Pelican. Don’t trust other cases to have a handle that holds up to the weight.

If you do the same, here’s what I recommend when designing your foam:
  • Add finger cut-outs for the balls. Even though they have the narrow neck, there’s surprisingly little room to get your finger in there. I’ll end up using the pin hole to get them out.
  • Err on the side of making the holes too shallow. The balls in particular are set farther in than they should be. If the hole is a bit too shallow it will just compress the foam in the lid, which is fine.
  • Leave a bit of extra room around the dust cap for the locking pins. I thought I had it drawn out well, but it’s tight. And because the cap is rubber it grabs the foam more than metal on its way in/out. Going to need to cut back the foam a bit there.

FB589B08-9FC8-434A-A836-5C05F29274A2.jpeg
C592D535-2A12-4828-AF89-1DE845F2F7E5.jpeg
F375F1B2-9AEB-49CA-A14E-95B351F1D079.jpeg
4A40CACA-F3AF-4A33-9AB8-7C999ED7EF99.jpeg


Original post with detailed description of what was purchased and relevant links:

 
Last edited:
Pelican case for my Weigh Safe hitch is fully assembled. And it. Is. Awesome.

Case weighs 57 pounds with everything in it. This is the reason I went Pelican. Don’t trust other cases to have a handle that holds up to the weight.

If you do the same, here’s what I recommend when designing your foam:
  • Add finger cut-outs for the balls. Even though they have the narrow neck, there’s surprisingly little room to get your finger in there. I’ll end up using the pin hole to get them out.
  • Err on the side of making the holes too shallow. The balls in particular are set farther in than they should be. If the hole is a bit too shallow it will just compress the foam in the lid, which is fine.
  • Leave a bit of extra room around the dust cap for the locking pins. I thought I had it drawn out well, but it’s tight. And because the cap is rubber it grabs the foam more than metal on its way in/out. Going to need to cut back the foam a bit there.

View attachment 52271View attachment 52272View attachment 52273View attachment 52274

Original post with detailed description of what was purchased and relevant links:

Wow, very nice to have a case for it. But afraid to ask, it’s probably at least 1/2 the cost of the hitch itself.

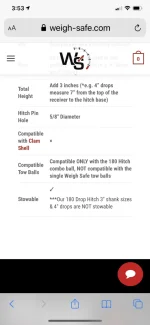
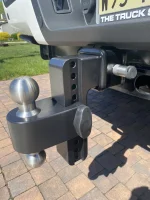
I just received the 3” version of the hitch and realized that it is not stowable. The website had a logic error with “&” vs or. so i safely assumed its not compatible only with a 4 inch drop. Who ever wrote that description definitely didn’t take logic theory in college:-) but i like the 3” version so much thinking ill just keep it, not a big deal that i cant stow it, if anything its more protection.
 

Attachments

  • 4A5DBF8F-AB70-4080-9736-9217B0D2241F.webp
    4A5DBF8F-AB70-4080-9736-9217B0D2241F.webp
    31.3 KB · Views: 91
  • D21BA6C7-C0BD-4848-AEC2-D2A0E84371AD.webp
    D21BA6C7-C0BD-4848-AEC2-D2A0E84371AD.webp
    123.6 KB · Views: 91
Wow, very nice to have a case for it. But afraid to ask, it’s probably at least 1/2 the cost of the hitch itself.
Ya it wasn't cheap - about $180 for the custom foam and $185 for the case (both including shipping and taxes). Figured, like the hitch, it's a lifetime investment. Wanted something to keep all of the bits of the hitch together and protect them, rather than having them loose. Whether that's in my garage or the bed of the truck.

Even if I attached as much as I could to the hitch, I would still have 2 extra balls and the pintle adapter hanging out loose.

I just received the 3” version of the hitch and realized that it is not stowable. The website had a logic error with “&” vs or. so i safely assumed its not compatible only with a 4 inch drop. Who ever wrote that description definitely didn’t take logic theory in college:) but i like the 3” version so much thinking ill just keep it, not a big deal that i cant stow it, if anything its more protection.
Congrats! That thing's beefy with the 3" shank! That is unfortunate about the wording. Can be deduced by looking at the 3" shank drop options and seeing 4" drop isn't an option, but that certainly can't be expected for the consumer to figure that out.
 
Look at this guy with his two extra balls and his pintle hanging loose...
Hey, that's why I got a protective case! Dangerous to have them bouncing around in the elements fully exposed. ;)
 
Pelican case for my Weigh Safe hitch is fully assembled. And it. Is. Awesome.

Case weighs 57 pounds with everything in it. This is the reason I went Pelican. Don’t trust other cases to have a handle that holds up to the weight.

If you do the same, here’s what I recommend when designing your foam:
  • Add finger cut-outs for the balls. Even though they have the narrow neck, there’s surprisingly little room to get your finger in there. I’ll end up using the pin hole to get them out.
  • Err on the side of making the holes too shallow. The balls in particular are set farther in than they should be. If the hole is a bit too shallow it will just compress the foam in the lid, which is fine.
  • Leave a bit of extra room around the dust cap for the locking pins. I thought I had it drawn out well, but it’s tight. And because the cap is rubber it grabs the foam more than metal on its way in/out. Going to need to cut back the foam a bit there.

View attachment 52271View attachment 52272View attachment 52273View attachment 52274

Original post with detailed description of what was purchased and relevant links:

2 words… FREAKIN AWESOME!

I didn’t know you could even order something like that. My mind is spinning with possibilities.
 
2 words… FREAKIN AWESOME!

I didn’t know you could even order something like that. My mind is spinning with possibilities.
Right?! Sure it's possible to cut the foam yourself. But man is it cool having it show up with the holes cut perfectly for the things you're putting in.

Pelican costs a pretty penny, but IMO their quality justifies the price.
 
Right?! Sure it's possible to cut the foam yourself. But man is it cool having it show up with the holes cut perfectly for the things you're putting in.

Pelican costs a pretty penny, but IMO their quality justifies the price.
I cut the foam on a pelican for something as simple as my laptop and it didn’t go all that well to be honest. The route you took is the right way to go.
 
Last edited:
I took it off. Don't think there was anything particularly concerning behind it, but it's so easy to remove you might as well.

It's just held on with some metal clips. Easy to pull off and, if you need to, push from behind to get it started. A couple of the clips weren't grabbing well when I tried to reinstall it, but all I had to do was bend them a bit and then they held great.
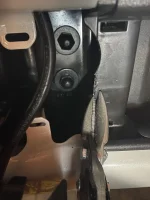
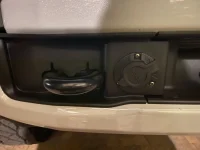
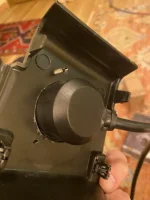
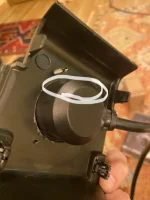
I got it done. But i have to say no one mentioned the plastic piece from inner trim getting in the way of attaching the outer trim back on - noco was pushing into it on right hand side. I used my right angle aviation snips to cut it off, but without trimming that inner piece it would not have been possible to attach the outer piece with noco back on.
 

Attachments

  • 123A4B9E-4A38-4070-A4B1-9C69F72A20FE.webp
    123A4B9E-4A38-4070-A4B1-9C69F72A20FE.webp
    84.6 KB · Views: 113
  • 2BCC61FD-8419-47C6-A593-0C7616D305DE.webp
    2BCC61FD-8419-47C6-A593-0C7616D305DE.webp
    101.5 KB · Views: 111
I got it done. But i have to say no one mentioned the plastic piece from inner trim getting in the way of attaching the outer trim back on - noco was pushing into it on right hand side. I used my right angle aviation snips to cut it off, but without trimming that inner piece it would not have been possible to attach the outer piece with noco back on.
I don't think I'm following where exactly you had to trim. I definitely didn't have to trim anything for mine.

Do you mean the middle trim piece that's overlapped by the outer trim piece getting in the way?

I wonder if I placed mine slightly differently and that avoided the issue by pure luck?
 
I don't think I'm following where exactly you had to trim. I definitely didn't have to trim anything for mine.

Do you mean the middle trim piece that's overlapped by the outer trim piece getting in the way?

I wonder if I placed mine slightly differently and that avoided the issue by pure luck?
The back of NOCO plug on the right hand side ( if facing the truck) was bumping into the inner piece of plastic trim. There was no other way to get around it other then to cut it off by about 1/2 an inch. Once i did that the outer trim piece perfectly snapped into place.
 
The back of NOCO plug on the right hand side ( if facing the truck) was bumping into the inner piece of plastic trim. There was no other way to get around it other then to cut it off by about 1/2 an inch. Once i did that the outer trim piece perfectly snapped into place.
I initially thought that piece you’re talking about was metal (never actually messed with it to realize it’s just plastic). I shifted the NOCO plug to the passenger side so that it would clear. Only after I cut the hole did I realize it was plastic. Oh well.
 
Pelican case for my Weigh Safe hitch is fully assembled. And it. Is. Awesome.

Case weighs 57 pounds with everything in it. This is the reason I went Pelican. Don’t trust other cases to have a handle that holds up to the weight.

If you do the same, here’s what I recommend when designing your foam:
  • Add finger cut-outs for the balls. Even though they have the narrow neck, there’s surprisingly little room to get your finger in there. I’ll end up using the pin hole to get them out.
  • Err on the side of making the holes too shallow. The balls in particular are set farther in than they should be. If the hole is a bit too shallow it will just compress the foam in the lid, which is fine.
  • Leave a bit of extra room around the dust cap for the locking pins. I thought I had it drawn out well, but it’s tight. And because the cap is rubber it grabs the foam more than metal on its way in/out. Going to need to cut back the foam a bit there.

View attachment 52271View attachment 52272View attachment 52273View attachment 52274

Original post with detailed description of what was purchased and relevant links:

Man that's a nice setup for storage. I've got the same hitch package except I went with the 6" drop and don't have the pintle attachment yet, probably down the road. I chose the 6" up front because that's all I need for now. When I get my new travel trailer I'm going to invest in the WeighSafe WD hitch and I'll get it with the 8" drop. I figure at that point I'll be able to cover any hitch height and any weight of trailer within the capacity of my truck. Nice thing is the steel 6" will work the same with the WD system as the 8" that comes with the WD system.

Regarding the aluminum version, after reading a few reviews of the aluminum setup developing play in the shank over time, and the ball insert getting stuck in the socket because of galvanic corrosion, I decided the steel version was the only way to go.
 
Man that's a nice setup for storage. I've got the same hitch package except I went with the 6" drop and don't have the pintle attachment yet, probably down the road. I chose the 6" up front because that's all I need for now. When I get my new travel trailer I'm going to invest in the WeighSafe WD hitch and I'll get it with the 8" drop. I figure at that point I'll be able to cover any hitch height and any weight of trailer within the capacity of my truck. Nice thing is the steel 6" will work the same with the WD system as the 8" that comes with the WD system.

Regarding the aluminum version, after reading a few reviews of the aluminum setup developing play in the shank over time, and the ball insert getting stuck in the socket because of galvanic corrosion, I decided the steel version was the only way to go.
That makes a lot of sense! I didn't realize the 6" works for both WD and not. Does it not need the extra angled piece because of the shorter drop?

And agreed on the aluminum. That was on my mind, and supporting pintle pushed me over to steel definitively. Hated investing this kind of money into a hitch setup and explicitly preventing myself from getting the pintle adapter.
 
That makes a lot of sense! I didn't realize the 6" works for both WD and not. Does it not need the extra angled piece because of the shorter drop?

And agreed on the aluminum. That was on my mind, and supporting pintle pushed me over to steel definitively. Hated investing this kind of money into a hitch setup and explicitly preventing myself from getting the pintle adapter.
Yep the 8" drop shank has the gusset to reinforce for the extra length. I doubt I'll need to use the 6" for WD purposes but it is capable. Nice thing is the 8" can be used without WD system in the event I need a lower drop or higher rise for some reason.

I wasn't aware that WeighSafe had introduced a pintle attachment so that may now be added to the list of accessories. I do like the added articulation of the pintle connection system.

Thanks for sharing so much detail on your storage system. I may need to invest in your Pelican system as well. It's very clean and the parts not in use would be easy to keep track of and all together when stored.
 
I got it done. But i have to say no one mentioned the plastic piece from inner trim getting in the way of attaching the outer trim back on - noco was pushing into it on right hand side. I used my right angle aviation snips to cut it off, but without trimming that inner piece it would not have been possible to attach the outer piece with noco back on.
I noticed yours ended up in a bit different orientation. Here is another example I found for comparison:

C3AC8B07-072D-4221-B242-F7F8E25C4699~2.webp


I haven't put mine in yet (have some time until next winter now, hahaha) but will have to look at it to see if there is something significant with a different rotation.
 
Just looking at mine my plan was to install so the logo is at 8:00ish so the plug is right side up. This places the outlet on the backside in the down orientation. Maybe I will change my mind when I get everything apart. Looks like yours is rotated 180 from that which may not make a difference with the clearance issue you experienced...

PXL_20220514_142204697.webp
 
Yep the 8" drop shank has the gusset to reinforce for the extra length. I doubt I'll need to use the 6" for WD purposes but it is capable. Nice thing is the 8" can be used without WD system in the event I need a lower drop or higher rise for some reason.

I wasn't aware that WeighSafe had introduced a pintle attachment so that may now be added to the list of accessories. I do like the added articulation of the pintle connection system.

Thanks for sharing so much detail on your storage system. I may need to invest in your Pelican system as well. It's very clean and the parts not in use would be easy to keep track of and all together when stored.
Glad it’s helpful!
 
I noticed yours ended up in a bit different orientation. Here is another example I found for comparison:

View attachment 52451

I haven't put mine in yet (have some time until next winter now, hahaha) but will have to look at it to see if there is something significant with a different rotation.
Its not about the rotation, it was about appr. 1/2 inch of the back of noco still pushing against inner plastic trim. Once you remove the trim, noco can go back all the way. Alternatively, you can offset the noco from the center to the left and it wont bump into anything, but i wanted the centered look. Its also possible your inner trim is a bit different. The reason i think ccw didnt have it is because with a winch that whole plastic part is not there to begin with. I dont have a winch, so it got real plasticy around those parts:)
 

Attachments

  • 6CF06EC1-9E5F-4AF0-9F32-B34B18BE17E6.webp
    6CF06EC1-9E5F-4AF0-9F32-B34B18BE17E6.webp
    57.9 KB · Views: 58
  • CDBD639D-7D58-40F3-9DBB-8507628045A4.webp
    CDBD639D-7D58-40F3-9DBB-8507628045A4.webp
    58.3 KB · Views: 56
I noticed yours ended up in a bit different orientation. Here is another example I found for comparison:

View attachment 52451

I haven't put mine in yet (have some time until next winter now, hahaha) but will have to look at it to see if there is something significant with a different rotation.
Probably the longest part of install was sitting there and playing around with different orientations😂 I switched mine 2-3 times until I finally returned to the pattern I initially wanted.
 
Back
Top Bottom