What have you 3D printed?

I have some kydex sheets I might just rig something myself. I only worry it will not be substantial enough to hold the weight of my hat in the heat being barely 1/16" thick
 
The kydex I use I heat in the oven to 300 but I think it gets pliable at lower temperatures. 300F gets it hot enough to mold but takes a bit to cool down and lock in the shape. Only played with it a little bit so I don't have a bunch of knowledge. As for the hook you showed me, I basically have those but heavier. I'm going to draw something by hand to show about what I am thinking. Basically the one @optimus showed that utilized both seat rods but has the hook "off to the left" when looking at the back of the passenger seat.

Anyone with kydex knowledge that can tell me if it will get soft in the truck can chime in at any time... @McE maybe 🤷
Kydex is good to go for use in a hot cab for sure. Unless your cab gets above 160F or so, then it could soften. LOTS of truck holsters made from Kydex out there.

Kydex is pretty cheap and if you already have some, I’d send it 👍🏼
 
Last edited:
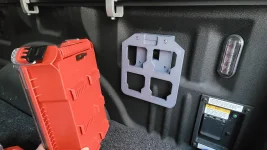
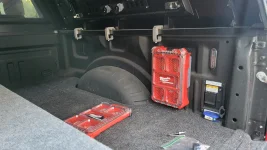
I 3d printed a Milwaukee packout mount that screws on over the boxlink plate. I saw one on makerworld but it was too tight to the top bed rail for the superduty for a packout box to install. I modified it by lowering an inch, adjusting the catch, and opening the center. The idea is to allow for a ratchet strap hook to pass through to hook around the metal. It mounts a box fine right now but could still use some further adjustments. This was printed in gray PETG but I think the final one I will do in desert sand ASA-CF.
I would like to design inserts for the packout boxes as well. Next on my list is to make a tool storage insert for a small socket set and hopefully have space for a cresent wrench and screwdriver.
 

Attachments

  • 20260615_203407.webp
    20260615_203407.webp
    245.2 KB · Views: 29
  • 20260615_203546.webp
    20260615_203546.webp
    365.8 KB · Views: 29
I 3d printed a Milwaukee packout mount that screws on over the boxlink plate. I saw one on makerworld but it was too tight to the top bed rail for the superduty for a packout box to install. I modified it by lowering an inch, adjusting the catch, and opening the center. The idea is to allow for a ratchet strap hook to pass through to hook around the metal. It mounts a box fine right now but could still use some further adjustments. This was printed in gray PETG but I think the final one I will do in desert sand ASA-CF.
I would like to design inserts for the packout boxes as well. Next on my list is to make a tool storage insert for a small socket set and hopefully have space for a cresent wrench and screwdriver.
Any plans to make that file public?
 
I 3d printed a Milwaukee packout mount that screws on over the boxlink plate. I saw one on makerworld but it was too tight to the top bed rail for the superduty for a packout box to install. I modified it by lowering an inch, adjusting the catch, and opening the center. The idea is to allow for a ratchet strap hook to pass through to hook around the metal. It mounts a box fine right now but could still use some further adjustments. This was printed in gray PETG but I think the final one I will do in desert sand ASA-CF.
I would like to design inserts for the packout boxes as well. Next on my list is to make a tool storage insert for a small socket set and hopefully have space for a cresent wrench and screwdriver.
Wait, I just read this again, did you design it, or just find the file online?
 
I 3d printed a Milwaukee packout mount that screws on over the boxlink plate. I saw one on makerworld but it was too tight to the top bed rail for the superduty for a packout box to install. I modified it by lowering an inch, adjusting the catch, and opening the center. The idea is to allow for a ratchet strap hook to pass through to hook around the metal. It mounts a box fine right now but could still use some further adjustments. This was printed in gray PETG but I think the final one I will do in desert sand ASA-CF.
I would like to design inserts for the packout boxes as well. Next on my list is to make a tool storage insert for a small socket set and hopefully have space for a cresent wrench and screwdriver.
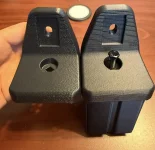
Looks awesome! Just my 2 cents but I would probably choose standard ASA vs. ASA-CF for something like this because it’s much tougher and has better layer adhesion. I mostly reserve ASA-CF for parts that won’t see much abuse but still exposed to UV and heat. It’s perfect for interior parts because the surface finish is so amazing. But I have been able to get a surface finish pretty close to ASA-CF with regular ASA by tweaking the fuzzy skin settings. ASA on the left, ASA-CF on the right.
 

Attachments

  • IMG_3904.webp
    IMG_3904.webp
    197.3 KB · Views: 21
Wait, I just read this again, did you design it, or just find the file online?
I initially download a file from makerworld and thought it was a great idea. Looks like it fits on the F150 but not the Superduty as designed. I had interference with one of my smartcap clamps also so not certain. I kept the front packout interface plate and redesigned the back portion as well as how the catch clips in. I will probably post on Makerworld once I complete my revisions. If anyone on here would like the file send me a private message.


Looks awesome! Just my 2 cents but I would probably choose standard ASA vs. ASA-CF for something like this because it’s much tougher and has better layer adhesion. I mostly reserve ASA-CF for parts that won’t see much abuse but still exposed to UV and heat. It’s perfect for interior parts because the surface finish is so amazing. But I have been able to get a surface finish pretty close to ASA-CF with regular ASA by tweaking the fuzzy skin settings. ASA on the left, ASA-CF on the right.
I only just started using ASA-CF and I heard it can have issues with layer to layer adhesion. I was having some issues with normal ASA warping during printing that the CF seemed to mitigate but admittedly I did not spend much time on fine tuning. Surface finish for this bedmount part isn't even that important since the side facing out will be the print bed surface. I may try with my carbon fiber texured plate although I have not used that for ASA before.
 
I initially download a file from makerworld and thought it was a great idea. Looks like it fits on the F150 but not the Superduty as designed. I had interference with one of my smartcap clamps also so not certain. I kept the front packout interface plate and redesigned the back portion as well as how the catch clips in. I will probably post on Makerworld once I complete my revisions. If anyone on here would like the file send me a private message.


I only just started using ASA-CF and I heard it can have issues with layer to layer adhesion. I was having some issues with normal ASA warping during printing that the CF seemed to mitigate but admittedly I did not spend much time on fine tuning. Surface finish for this bedmount part isn't even that important since the side facing out will be the print bed surface. I may try with my carbon fiber texured plate although I have not used that for ASA before.
Yes ASA warps horribly. I use big brims and set them tighter to the part than default. And use a higher bed temp if you can, 100C minimum but I have better results around 115C. And glue stick helps a lot.
 
I avoid ASA and ABS all together now, they both have major issues as they aren’t really designed for FDM 3D printing. ABS was designed for injection molding so the shrink rate is ideal for releasing from the molds.
I use Fiberon PET-GF, it’s about $30 a roll and is extremely strong. No larger adhesion problems, no warping problems, higher heat tolerance and higher solvent resistance.
Only issue is you have to be able to print at 300c
 
Waiting on delivery of the Bambu P2S today. Any pointers or tips would be appreciated. Thanks
AI is your friend when dialing in your print settings.
Take the time to input as much settings as you can into the chat and give it descriptive feedback and pictures so it can help you efficiently hone your settings.

Other than that, if its not enclosed, keep that in mind when printing certain filaments that are sensitive to temps.

🤙
 
I have some kydex sheets I might just rig something myself. I only worry it will not be substantial enough to hold the weight of my hat in the heat being barely 1/16" thick
This might be overkill for your application, but I went through a couple different head rest hooks and landed on these.


They are waaaaayyyy overbuilt but support my plate carrier and have enough space to hang a hat.
 
This might be overkill for your application, but I went through a couple different head rest hooks and landed on these.


They are waaaaayyyy overbuilt but support my plate carrier and have enough space to hang a hat.
Definitely more than I need. But, curious, how heavy is your vest?
 
Definitely more than I need. But, curious, how heavy is your vest?
I dunno the exact weight, but I have ceramic 11x14 front and rear, steel side plates, and misc gear on it. It hung in the truck for about 2 hours in total during time to air out (it was a hot day at the range). The hooks did not flex or warp with 90+ degree heat and with the plate carrier on it, which I would day is at least 30 lbs.
 
So has anyone printed rear console cup holder extensions yet, (I drive a 2024 SD). Ther factory setup sucks! If you corner over 35 MPH you can roll a drink cup right out of it.
 
So has anyone printed rear console cup holder extensions yet, (I drive a 2024 SD). Ther factory setup sucks! If you corner over 35 MPH you can roll a drink cup right out of it.
I have one that I’m working on designing. I already posted one for the front cupholders on makerworld.
 
Back
Top Bottom