Triggering Driving Light/Light Bar Relay Off LED High Beam

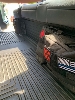
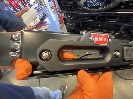
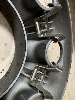
Just to close this up - start with a plan , make a patch in harness, with some tails, using the plug called out in this thread, pictures taken during reassembly ...

IMG_3231a.jpg
 
Last edited:
Easier way to get to the "plug" its under the air filter, you don't have to screw around with the wheel well lining , basically a 13mmm socket and a flat screwdriver

IMG_3227.jpg
IMG_3226.jpg
IMG_3225.jpg
IMG_3224.jpg
IMG_3223.jpg
 
Last edited:
Route cables and your done - can confirm absolutely that Pin 14 is the park light thats the thin orange marker in the middle of our led headlight - NOTE the pink step ladder is a definite sign of my manliness ...... unless y'all about 7'6" tall you will need to get on a step ladder to pop the air filter box out

IMG_3229.jpg
IMG_3230.jpg
 
Last edited:
@dttheliman Where did you source your connector parts?
 
Is there more than one harness connector behind the front passenger wheel. I took the liner out today and only saw one, it didnt fit the connecter that was shipped to me form custom autoworks.
 
Is there more than one harness connector behind the front passenger wheel. I took the liner out today and only saw one, it didnt fit the connecter that was shipped to me form custom autoworks.
Yes, see my original post and follow up photos
 
this thread is great!!! I have a 2024 and before i pull the airbox or fender liner I'm hoping someone can confrim all this applies to the 2024 f250 Tremor??

thanks!
 
If you wish to trigger your driving light or light bar relay so that they are switched off your high beam, I have finally got this to work without blowing the BCM. You can also run auxiliary indicators and parking lights if, like me, you have a bullbar.

It is actually quite straightforward, if a somewhat time consuming process. You will need some sidecutters, a soldering iron, heatshrink and a heat gun. To make it tidy, add some electrical tape and cable ties. And a 1/4“ drive socket set. I found I had to use both metric and AF sockets to remove the inner wheel well liner. I also had removed both headlights and grill as I was also installing the bullbar. Note, my truck is RHD so you’ll have to convert this in your head for LHD.

Remove drivers side inner wheel well liners. Once you have both out, you may want to consider removing the drivers side headlight. It lets more light in and also makes it easier to run cable. I also found a convenient earth point hidden by the headlight.

You will see a white connector in the middle of the wheel well, and a bigger connector to your left near the firewall. Ignore them. To your right, toward the front of the truck but tucked up against front guard, is a black 16 pin connector. There are about 15 wires on one side and only 4 or 5 on the other. To undo the connector, you must pull back a red locking tab. On the side with lots of wires, in one corner there is a grey wire. That wire is for the LH indicator. Next to it moving away from the corner is a yellow wire with a blue trace. That is your RH indicator wire. The next wire down is a blue wire with a grey trace. This wire is for your parking lights. Go back up to the grey wire and next to it in the other corner is a grey wire with a brown trace. This is the wire for the LH high beam. It doesn’t matter that it’s for the LH side, it just needs to trigger the relay. Just in case there is a difference in my truck because it’s RHD, check with a multimeter .

I cut away the tape and flexible conduit to expose more of the wires. Although there are no corresponding wires on the other side connector, I cut each wire about 40mm from the connector. Just in case I get it wrong there’s enough wire to fix it! I cut and soldered each wire in turn. then at the end came back at the end with the heat gun for the heatshrink.

The high beam trigger wire went to pin 86 on the driving light, with pin 85 to earth, pin 87 to the driving lights and pin 30 to the upfitter switch.

I will try and post a photo of the connector and where it is in the wheel well. I am still having trouble uploading photos.

I hope this helps, and good luck
getting ready to head down the same path with a 2024 f250 .... does anyone know if the plow plug is still available and pinned the same as the OP in 2022??? THANKS
 
this thread is great!!! I have a 2024 and before i pull the airbox or fender liner I'm hoping someone can confrim all this applies to the 2024 f250 Tremor??

thanks!
You may have to take the plunge I made back then and see. Just go armed with a multi meter and see how you go. Seeing as they come with both halogen and LED lights on the 24, there’s a good chance they haven’t needed to change the wiring. Good luck!
 
You may have to take the plunge I made back then and see. Just go armed with a multi meter and see how you go. Seeing as they come with both halogen and LED lights on the 24, there’s a good chance they haven’t needed to change the wiring. Good luck!
thank you will do.

it's a cold world, pack your own heat (multi meter or 9mm)
 
The wires in the plow harness are just trigger wires correct, or is there an actual amp rating? Or can you wire lamps directly to them (assuming like you were planning to utilize the lights to power traditional plow lights.

I have a couple thoughts, my bigbangers have a high/low for the backlights. I am wondering if I can use the park lamps or one of the low beam circuits to trigger the backlights in the high power settingand then utilize the left and right blinkers (#15 and #16 from the wire diagram) to be the trigger for low lamp setting and then they would cycle with the blinkers lol. Then instead of utilizing my upfitter I would use the high beam trigger to excite the relay for the pods to turn them on.

The intent, according to The Retrofit Source, for the high and low power back light is to run the backlight in HP during the day and then dim down to reduce glare/intensity at night.
All wires have an amp rating.

If you are referring to the wires from my original post, they can run the parking and indicator lights without relays. If what you are trying to do is power lights or anything else drawing more power than that, then I’d get some relays and use these wires as switching wires. Unfortunately I don’t understand what it is you are trying to do.
I want to use the park lamp circuit to power the "back light" or DRL essentially on these pods. Then (it has a separate voltage sense) to dim down for night time operation (I want to tap that sense wire into the blinkers, normally you tap that into your headlight or park lamp wire). This way if when I turn on a blinker the corresponding light would blink in a high/low operation.

This video shows the pods
. At around 0:54 seconds it explains the dual intensity back light. (shameless plug, that's my truck at 7 seconds lol) When the backlight harness senses add'l 12v it will dim down the lights. There's 3x 12+ wires (Back light high setting, back light low setting, and then 12v to relay trigger for the actual pod output. When you connect the backlight lead to 12v it's automatically in high setting, when it senses the add'l 12v off the other lead it will dim down.

So this is what they look like and my thoughts utilizing the snowplow harness
Back Light Low (blinker trigger), Back Light High (park lamps), POD actually turned on (that would be powered by a relay).
1712082337270.png
1712082357576.png
1712082385685.png
 
I want to use the park lamp circuit to power the "back light" or DRL essentially on these pods. Then (it has a separate voltage sense) to dim down for night time operation (I want to tap that sense wire into the blinkers, normally you tap that into your headlight or park lamp wire). This way if when I turn on a blinker the corresponding light would blink in a high/low operation.

This video shows the pods
. At around 0:54 seconds it explains the dual intensity back light. (shameless plug, that's my truck at 7 seconds lol) When the backlight harness senses add'l 12v it will dim down the lights. There's 3x 12+ wires (Back light high setting, back light low setting, and then 12v to relay trigger for the actual pod output. When you connect the backlight lead to 12v it's automatically in high setting, when it senses the add'l 12v off the other lead it will dim down.

So this is what they look like and my thoughts utilizing the snowplow harness
Back Light Low (blinker trigger), Back Light High (park lamps), POD actually turned on (that would be powered by a relay).
View attachment 151085View attachment 151086View attachment 151087
Use pin 14 its hot with the run lights and low beams
 
Back
Top