Navigation
Install the app
How to install the app on iOS
Follow along with the video below to see how to install our site as a web app on your home screen.
Note: This feature may not be available in some browsers.
More options
Style variation
You are using an out of date browser. It may not display this or other websites correctly.
You should upgrade or use an alternative browser.
You should upgrade or use an alternative browser.
🛠️ What did you do to your Tremor today? [2025 edition]
- OP 🔹 modified
- Start date
- Status
- Not open for further replies.
I’d say so, you got enough wrapped up in that to pay off my mortgage.I’ve been busy during Christmas break!


- Jul 26, 2025
- 2,243
- 4,100
- '25 F350 XLT Tremor 7.3 Guzziller Carbonized Grey
- '16 F150 5.0 Coyote/6R80 SuperCrew
OmahaBravo
I've not seen it in person but the only dimensions provided on his site for the metal used in constructing it are 3/8 and 1/4 inch.
In hindsight, I guess you're referring to the hidden winch mount; the one linked earlier today.
Gotcha!
It's beefy, I'll give 'em that.



Now that I have a topper I started working on my own version of a decked system. After seeing that they want $2000 for a base system and since I have a long bed it’s an extra $500 for the plastic piece to fill the gap at the edge of the bed. I decided I can probably make my own it just won’t be as pretty
3/4 plywood top and bottom. 2x10 sides
Drawers are 1/2 plywood and 1x8 sides
Painted with raptor liner
Drawers are 90” long and 20” wide
Each supported on 15 1/2” roller bearings to act as a drawer slide. Each drawer capable of 100% extension
Tomorrow I need to make a face plate for the drawers and add a handle, then figure out what I want to do to fill the space between the tool drawers and the bed
sidewall.

Optimus🤖
Leader of the Autobots
Tremor of the Month 🏆
Meetup Organizer 🎲
Founding Member 📜
GB Coordinator 📢



- Sep 20, 2023
- 13,311
- 36,158
- I always respond first.
- Double Deuce Carbonized Gray F250 Platinum 7.3L Tremor
- She's still riding...
Looking good. You decking this thing out!Now that I have a topper I started working on my own version of a decked system. After seeing that they want $2000 for a base system and since I have a long bed it’s an extra $500 for the plastic piece to fill the gap at the edge of the bed. I decided I can probably make my own it just won’t be as pretty
3/4 plywood top and bottom. 2x10 sides
Drawers are 1/2 plywood and 1x8 sides
Painted with raptor liner
Drawers are 90” long and 20” wide
Each supported on 15 1/2” roller bearings to act as a drawer slide. Each drawer capable of 100% extension
Tomorrow I need to make a face plate for the drawers and add a handle, then figure out what I want to do to fill the space between the tool drawers and the bed
sidewall.
View attachment 240362
View attachment 240363
View attachment 240364


- Jun 25, 2020
- 6,390
- 10,790
- >>US Army<<
- Is she DAF or just ignoring me??
- 2022 F350 CCLB (11/2022)
- 2015 F350 CCLB 225k // 2006 F350 CCLB 280k
Looking good. You decking this thing out!
Don't get scared off by @Optimus🤖 ....He loves seeing other people's wood.


Optimus🤖
Leader of the Autobots
Tremor of the Month 🏆
Meetup Organizer 🎲
Founding Member 📜
GB Coordinator 📢
- Sep 20, 2023
- 13,311
- 36,158
- I always respond first.
- Double Deuce Carbonized Gray F250 Platinum 7.3L Tremor
- She's still riding...
You wood say that you deck!
It may not be the prettiest but it is big and black…. Just how I like myYou wood say that you deck!
Coffee
Optimus🤖
Leader of the Autobots
Tremor of the Month 🏆
Meetup Organizer 🎲
Founding Member 📜
GB Coordinator 📢
- Sep 20, 2023
- 13,311
- 36,158
- I always respond first.
- Double Deuce Carbonized Gray F250 Platinum 7.3L Tremor
- She's still riding...
Fantastic! With all that wood you gonna have lots of cream for your coffeeIt may not be the prettiest but it is big and black…. Just how I like my
Coffee
.Mounted the off-roam mount that was under the tree from kids…
It’s too rainy to get to the wireless winch receiver as my OCD won’t just be as simple as route and zip tie. I’ll want to make it look OEM and hide wires as much as possible.
It’s too rainy to get to the wireless winch receiver as my OCD won’t just be as simple as route and zip tie. I’ll want to make it look OEM and hide wires as much as possible.
Attachments

Finished up the drawers today.
Spent way too much money on new tools and packouts
Drawers all move relatively easily considering how heavy they are thanks to the roller bearings.
Left side has spare ppe, recovery gear, winter boots and tie downs
Right side has tools.
235 piece gear wrench socket kit
Ratcheting flat wrenches
Pliers
Wire tools
Dewalt 1/2 impact
Dewalt impact driver
Dewalt tire inflator
Tire patch kit
Spare work gloves
Space next to it is accessible but empty for now save for a 20 ton bottle jack
Picked up that nifty clamp on vise at harbor freight for $25
And got a badlands off-road jack I need to get mounted sometime
- Staff 🛡️
- #4,714

- Jun 25, 2021
- 10,995
- 20,647
- 22MY F250 Star White Lariat Tremor
- 22MY Winnebago Voyage 2831RB
Nice setup!Finished up the drawers today.
Spent way too much money on new tools and packouts
Drawers all move relatively easily considering how heavy they are thanks to the roller bearings.
Left side has spare ppe, recovery gear, winter boots and tie downs
Right side has tools.
235 piece gear wrench socket kit
Ratcheting flat wrenches
Pliers
Wire tools
Dewalt 1/2 impact
Dewalt impact driver
Dewalt tire inflator
Tire patch kit
Spare work gloves
Space next to it is accessible but empty for now save for a 20 ton bottle jack
Picked up that nifty clamp on vise at harbor freight for $25
And got a badlands off-road jack I need to get mounted sometime
View attachment 240428
View attachment 240429
View attachment 240430
View attachment 240431

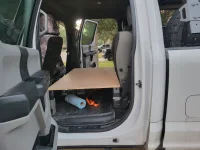
Detailed pics of mounting please. Nice ideaWorking on a platform for the back seat area. Ecoflow deltamax 2, extra battery and dc charger. Plus whatever else I need. Also enough room under for some bins to to slide out on. Rear seat stayed in truck.
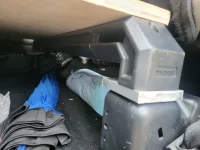
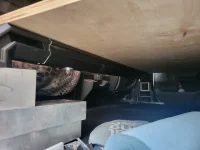
So for the mounting I am repurposing my old putco venture tec bed rails. I was looking at different solutions t-slot, wood or just welding something together. Then I remembered I had these in the garage so I cut them down. The rear one is bolted to the seat frame using a .5x4 inch spacer and the putco hardware. The front leg, I am still working out how I want to secure it with out drilling holes. My best thought so far is the outer most rear seat bolts, using a spacer to clear the plastic and another peice of .5x4 as a base then make a single foot out of some 3x3x.25 aluminum tube I have. The plat form is 51x29 inches of .75 birch plywood secured with 4 .375 bolts. It is fairly light, more than capable of supporting the weight and easily removable. If needed I can cut the plywood down and use the t-slot on the venture tec and have a fairly infinite set up using brackets and adapters. I only have it as a spare because I went through a car wash with the upper bars on and it bent the track back on one side.Detailed pics of mounting please. Nice idea
I also got the Midland gmrs installed and starlink mounted on the roof. Once I get the height where I want it, I will make better front feet. Some adjustable feet would be nice. That way I can raise and lower as mission dictates.
Attachments



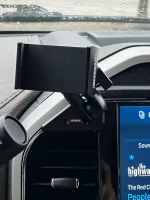
Has anyone seen this amount of messages pop up it cycled through for the 20 min ride home wouldn't go away. When I had it at the dealer they couldn't chase this down said everything had a fault and couldn't clear the error codes. They of course think the aftermarket lights are possibly causing it but nothing is tapped into the truck and it's all through the switchpro. Not sure how to chase this down. Anyone have experience like this??



The rear seat bolts is where i'll be looking when i get to building out my interior.So for the mounting I am repurposing my old putco venture tec bed rails. I was looking at different solutions t-slot, wood or just welding something together. Then I remembered I had these in the garage so I cut them down. The rear one is bolted to the seat frame using a .5x4 inch spacer and the putco hardware. The front leg, I am still working out how I want to secure it with out drilling holes. My best thought so far is the outer most rear seat bolts, using a spacer to clear the plastic and another peice of .5x4 as a base then make a single foot out of some 3x3x.25 aluminum tube I have. The plat form is 51x29 inches of .75 birch plywood secured with 4 .375 bolts. It is fairly light, more than capable of supporting the weight and easily removable. If needed I can cut the plywood down and use the t-slot on the venture tec and have a fairly infinite set up using brackets and adapters. I only have it as a spare because I went through a car wash with the upper bars on and it bent the track back on one side.
The challenge is going to be designing it. You'll likely (should!) leave the padding/cover in place which means when you set your initial platform in it will compress some but once you load it down with goodies, itll compress even further.
For this reason, i'd make whatever bracket attaches via the seat bolt, have it adjustable at the platform so you can accommodate that change. Just slot it on the leg, load it up and then tighten it once its in its settled position. Might not be a bad idea to use alum extrusion for the front legs to give you a clean consistent slot?
Nicely done on upcycling of those load bars!

Any wiring harness connections removed recently especially on the outside ? I had this issue on my last truck and was a harness that got water inside causing fault codes. Also if the stealer ship is trying to put blame disconnect the lights and cycle the truck and see if still present.
Has anyone seen this amount of messages pop up it cycled through for the 20 min ride home wouldn't go away. When I had it at the dealer they couldn't chase this down said everything had a fault and couldn't clear the error codes. They of course think the aftermarket lights are possibly causing it but nothing is tapped into the truck and it's all through the switchpro. Not sure how to chase this down. Anyone have experience like this??
- Status
- Not open for further replies.