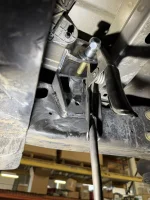
Making the rears work! I pulled the spare tire, pulled the harness out of the way that runs around the driver's side shock, and dropped the exhaust to make some room as these rear shock mounts are easy, but tedious. Factory, the rear shock mount is a 16mm stud. There are two issues with this - one, it's single shear (only supports the shock on one side); two, it's too close to the frame to allow clearance for the 3.0" body to clear. We keep the base shock mount to locate our mounts.
First thing, cut off the factory stud; this is the easy part. You'll notice in the above picture, there's a substantial amount of weld at the base of the stud. The way this mount works is by setting the stud into the hole that locates it, then they throw a FAT weld on it to secure it in place. With the stud cut, you're now tasked with grinding the surface until the circumference of the stud is visible in the base mount. This takes a bit, but a heavy-grit flap-disk makes pretty short work of it.
With this visible, take a punch and push it out; super easy!
With the stud removed, drill the driver's side to 9/16" to accept our 14mm flag bolt provided with the kit. Use this hardware to mock up the new shock mount and mark all surfaces to be cleaned/prepped for weld:
The passenger side is a touch different as the shock is slightly relocated. We use the factory hole to secure and locate the mount during weld.
Next, burn them in!
Once welded, paint all surfaces you can reach:
With all this done, you're ready to put the rear back together and install the shocks!
Truck is now reassembled and we are officially ready to drive and tune! Overall, this is a stupidly easy install that takes a couple hours for a SIGNIFICANT increase in shock mount strength to handle the party these 3.0" can throw!