That's some BATMAN shtuff right there...

Follow along with the video below to see how to install our site as a web app on your home screen.
Note: This feature may not be available in some browsers.
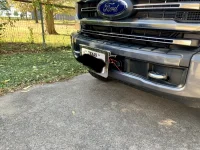
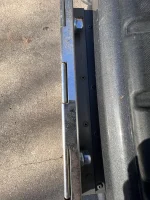
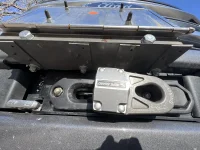
I purchased the plate holder from Amazon (search for Peterbilt plate holder). I built the bracket using a piece of 3/4” steel angle iron, some sheet metal and some galvanized bracket ties. As you can see from the picture, the plate holder is mounted to the steel angle iron (painted so it doesn’t rust), and that is mounted on the sheet metal. The angle iron provides rigidity to the sheet metal in the left-right direction. The ties are used to provide rigidity to the sheet metal in the front back direction. I attached the ties to the sheet metal using steel rivets. Holes are drilled to match the three holes in the front grill above the winch (again, see picture). I assembled everything together using 1/2” bolts and nuts.Could you give a little more info on your front license plate holder? Did you build it, or the mount for it? It looks great.
Thanks Willie! One follow-up question. Does it move back and forth when you have it in the down position, or is it spring loaded? I'm just wondering if it moves in the wind while you're driving.I purchased the plate holder from Amazon (search for Peterbilt plate holder). I built the bracket using a piece of 3/4” steel angle iron, some sheet metal and some galvanized bracket ties. As you can see from the picture, the plate holder is mounted to the steel angle iron (painted so it doesn’t rust), and that is mounted on the sheet metal. The angle iron provides rigidity to the sheet metal in the left-right direction. The ties are used to provide rigidity to the sheet metal in the front back direction. I attached the ties to the sheet metal using steel rivets. Holes are drilled to match the three holes in the front grill above the winch (again, see picture). I assembled everything together using 1/2” bolts and nuts.
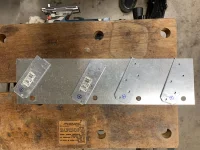
The picture below shows the sheet metal and the bracket ties. I designed it so the license plate holder does not make contact with the front grill in either the up or the down position.
Hope that helps. Let me know if you have any questions.
No, it’s not spring loaded but from the way it is designed, it doesn't move either. In the photo you can see that the steel the angle iron is mounted to, meets the plate holder in the down position.Thanks Willie! One follow-up question. Does it move back and forth when you have it in the down position, or is it spring loaded? I'm just wondering if it moves in the wind while you're driving.

If nothing else, it looks like a good way to keep stuff out of the winch and keep it cleaner.No, it’s not spring loaded but from the way it is designed, it doesn't move either. In the photo you can see that the steel the angle iron is mounted to meets the plate holder in the down position.
Thanks for your help and the pictures Willie! I like the setup. I saw the model you got on Amazon, and even saw your comment there, so I'm sure it's the right one. Really appreciate it.No, it’s not spring loaded but from the way it is designed, it doesn't move either. In the photo you can see that the steel the angle iron is mounted to, meets the plate holder in the down position.
Here are two more pictures I just took of how I implemented my bracket design for the Peterbilt plate holder. The first photo is the top-view where you can see the rivets attaching the angle iron to the steel metal. (BTW, I applied the paint to protect against rust.) The second photo is the bottom view showing the bracket ties, angle iron and the sheet metal. It also shows how the entire assembly is bolted to the truck.Thanks for your help and the pictures Willie! I like the setup. I saw the model you got on Amazon, and even saw your comment there, so I'm sure it's the right one. Really appreciate it.
Thanks! That helps a lot. Did you use existing holes to mount it to the truck, or drill?Here are two more pictures I just took of how I implemented my bracket design for the Peterbilt plate holder. The first photo is the top-view where you can see the rivets attaching the angle iron to the steel metal. (BTW, I applied the paint to protect against rust.) The second photo is the bottom view showing the bracket ties, angle iron and the sheet metal. It also shows how the entire assembly is bolted to the truck.
Hope this helps!
Thank you! Really appreciate your help.The holes are already there. No mods to the truck are required.
Came here to find out why our winch stopped working. Thanks all for the insight.Glad you’re taking it back to them. Aside from your time to dismantle everything, they should reimburse you for the controller you bought and anything else, and clean up the mess that the water made. Can’t believe that install was from the factory. You can’t be the only one this has happened to. I hope the dealer makes it right.

Where did you find the contactor from? Think this is what’s wrong with mine. Gonna get a relocation kit and move the control box up in to engine bay but need the contacor numberThe factory Warn winch install is troublesome. I was having issues with my winch operating so I started to backtrack power and so forth. What I discovered is the contactor is installed upside down under the front left, attached to two cross member bolts. Since it was installed upside down and no drain holes were drilled, water sat in it until it would evaporate which is never. I ended up replacing the contactor for approximately $300. There is no other good place to install so I installed the same location but drilled holes in the plastic covering so the water would drain out. Please check yours to see if it has been installed the same way, if so, put some drain holes in the plastic cover or you will be replacing yours also. Not only did I need to replace but I ended up needing to run a new positive cable to the battery and rewiring the switch to the fairlead connection.View attachment 108982View attachment 108983