I have a pretty big family and we needed the 6 passenger configuration, but I preferred the console on the truck. After doing some research online I found some folks that had swapped between the two. I looked at part availability and found that the jump seats are relatively easy to come by, but the consoles are not. When you do find a console it is easily over $1000. I ordered my truck with the console with the idea that I might swap it out. I gathered the parts and *mostly* finished the project. I thought I would post what I did so anyone who is considering it can see that it is completely doable.
First I sourced the jump seat from Ebay. The black leather lariat (my trucks spec) jump seats are really scarce and expensive, but the XL grey vinyl ones are common.
Ebay:
View attachment 26781View attachment 26782
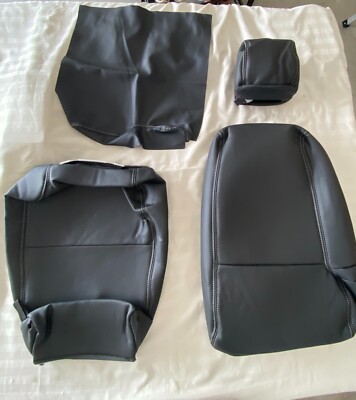
More Ebay searching and I found the Katzkin black leather covers for the jumpseat.
View attachment 26783
Reskinning the seat cover
..video removed..
Edit: Apparently the original video I used is no longer on youtube... I found this one that should work:
The video talks about the most time consuming part of the reskin being the top door cover over the storage, and it is. Apparently it is very easy to break most of the little plastic tabs off the cover which makes it a big ordeal to reaffix the two halves, but I was lucky and only broke a couple off. I used this little scraper to pop the panel off:
View attachment 26784View attachment 26785View attachment 26786View attachment 26787
I bought this cheap little upholstery stapler for the job:
I ran into a little snag with the bottom cushion - there are two types. I think the F150 does not have the bottom storage compartment that the SDs have, so I needed a replacement bottom cover - it is thicker and has the release cutout for the bottom storage:
View attachment 26789
The mostly reskinned and reassembled seat:
View attachment 26790View attachment 26791
Now the removal of the console. I found a few videos online that helped:
This first video is janky but honestly was one of the most helpful
Forum posts:
2017 - 2022 Super Duty - Help needed - Center Console removal - No Key detected Error - wiring diagram? - Does anyone have a wiring diagram for the 2017 Super Duty (center console)? I have removed the center console and am unable to start the truck - Error message No Key Detected . I have traced...
www.ford-trucks.com
2017 - 2022 Super Duty - 2018 F350 King Ranch Console to Jump Seat Swap - Last year I bought my first brand new dream truck. 2018 F350 King Ranch. Now we have a 4th kiddo on the way and I am looking for solutions to haul all these kids around. I have searched high and low and found a few threads...
www.ford-trucks.com
All you need to do to remove the console is pull the main drink holder up in the back releasing the 6 or so clips, then pull that insert toward the rear. Unclip the 2 wiring harnesses attached to the bottom of it, one is the KV antenna (PATS) for the push button start, and one for the drink holder lights.
View attachment 26792
Unscrew the single screw from the far forward part of the left bottom trim piece and unsnap both left and right side pieces as directed in the video and remove them. There are also 2 small pieces to pop off, all covered in that video. Once those are off there are 6 10mm bolts to remove. Then the console can be slid rearward a bit. I unplugged the main wiring harness and the USB harness at that point, then tilted the console up to unplug the harness underneath.
This is the forward part under the console. You can see the air conditioning manifold that connects to the flow through ducts in the console to the rear seat vents, and the main white harness plug and the black USB plug. The heater manifold is directly under the AC manifold. It runs under the carpet and goes to the under seat floor vents for the rear passengers. My understanding is that a combined manifold can be purchased so the rear AC flows through the underfloor heater ducts, but I have not gotten those yet.
View attachment 26793
This is the bottom of the console tilted up and the remaining harness plug.
View attachment 26794
So one of the big concerns in this project is if you have a push button start you need to either buy a new KV antenna or move the existing one. They are only about $20 bucks, but the wiring harness is not cheap. There are just two torx holding the antenna to the bottom of the console (see previous picture of drink holder bottom) so I opted to move the existing one. Tracing the wires I found that the green/orange stripe and the blue/grey stripe were the two PATS antenna wires, so I just clipped 2 inline connectors and an old molex connector from a computer onto the main harness under the dash. I cut the 2 wire PATS harness from under the console drink tray so I could attach the required molex connectors to both the PATS plug side and the harness side, so whenever I decide to go back to the console all I need to do is unplug the PATS antenna from the front wire harness and plug it back into the underside of the console.
Inline connectors/ molex on PATS wires:
View attachment 26797
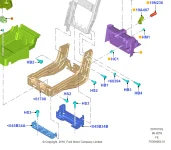
Once the console is removed you can see the same 2 brackets that hold either the console or jump seat. The trucks that come with the console do not have the bracket threads tapped, here are some pictures:
You can see the large jump seat untapped "nut" and the smaller console nut next to it. This is the front bracket.
View attachment 26795
The jump seat that I bought came with the brackets attached, so I did not have to worry about tapping them myself. Here is a comparison of the untapped and tapped rear brackets:
View attachment 26796
There are 4 bolts holding the two brackets in place, 18mm. Once the brackets are in place it is a simple task of just bolting the jump seat down (5x13mm). The only issue I ran into here is the right bottom rear bolt is blocked by the passenger seat rail. You need some way to access the bolt, like a universal joint ratchet.
Almost finished project:
View attachment 26798View attachment 26799View attachment 26800
The unfinished part - I have not purchased the vanity trim piece(s) to cover the lower dash where the console attached. Also the AC/heater manifold could be combined. Truthfully it is so low and not all that visible to me I'm not sure I will do it, since I plan to switch back to the console eventually. If I do swap it out I will update this post.
I hope this helps anyone out there considering the switch. It was not difficult and it is easily reversible - no damage was done to the truck by swapping it.